ByteChef Embedded, Part 7: New from Custom Workflow Builder
On this page
TL;DR: The sample app's Custom Workflow Builder (
/builder) is a workflow editor that ByteChef didn't draw. It keeps a trigger, actions and conditions in plain React state, renders them into ByteChef's workflow-definition JSON on every keystroke, then makes two kinds of calls to the embedded REST API:POST /automation/workflowsto create the workflow in the connected user's project, andPUT .../workflow-nodes/{node}/connection/{component}once per node to bind the user's connections. The result is an ordinary ByteChef workflow. You can open it in ByteChef's editor, publish it, enable it, and it runs on ByteChef's engine. This is part seven of the series.
So far in this series, every feature put a piece of ByteChef inside your product: the ConnectDialog, the ComponentKit, an AI chat with real tools, app events, synchronous requests and an MCP server. This part flips that around. Your users build automations in a UI that is 100% yours, and ByteChef only ever sees the JSON that UI produces.
Why would you want that? ByteChef's own workflow editor can be embedded, and it's powerful: a canvas, every component, data pills, loops, branches, a test runner. That's exactly what some products don't want. If your users are "set up a rule" people rather than "build a flow" people, you want a narrow, opinionated form in your own design system: when an email arrives, if the subject says invoice, post to #finance. The Custom Workflow Builder shows how small that layer can be.
Six Ways to Start a Workflow
Open Automations in the embedded sample app and expand the split button next to New from Template. Every entry ends in the same place, a workflow in the connected user's project, but each gets there differently:

- New from Template copies a workflow you published to the catalog.
- New from Embedded Workflow Builder creates an empty workflow and opens ByteChef's editor in an iframe.
- New from Prompt and New from Chat let ByteChef's AI Copilot generate the definition.
- New from Custom Workflow Builder (this part) hands authoring to your own UI and calls the REST API directly.
The last option is the most work for you and gives you the most control. It's also the best one for learning what a ByteChef workflow actually is, because you have to produce one by hand.
The Builder at a Glance
Click New from Custom Workflow Builder and you land on /builder. The left column is the editor: a label and description, a Trigger card, then a vertical list of steps you grow with Add Action and Add Condition. The right column is a live Workflow Definition panel that shows the exact JSON the page will send.
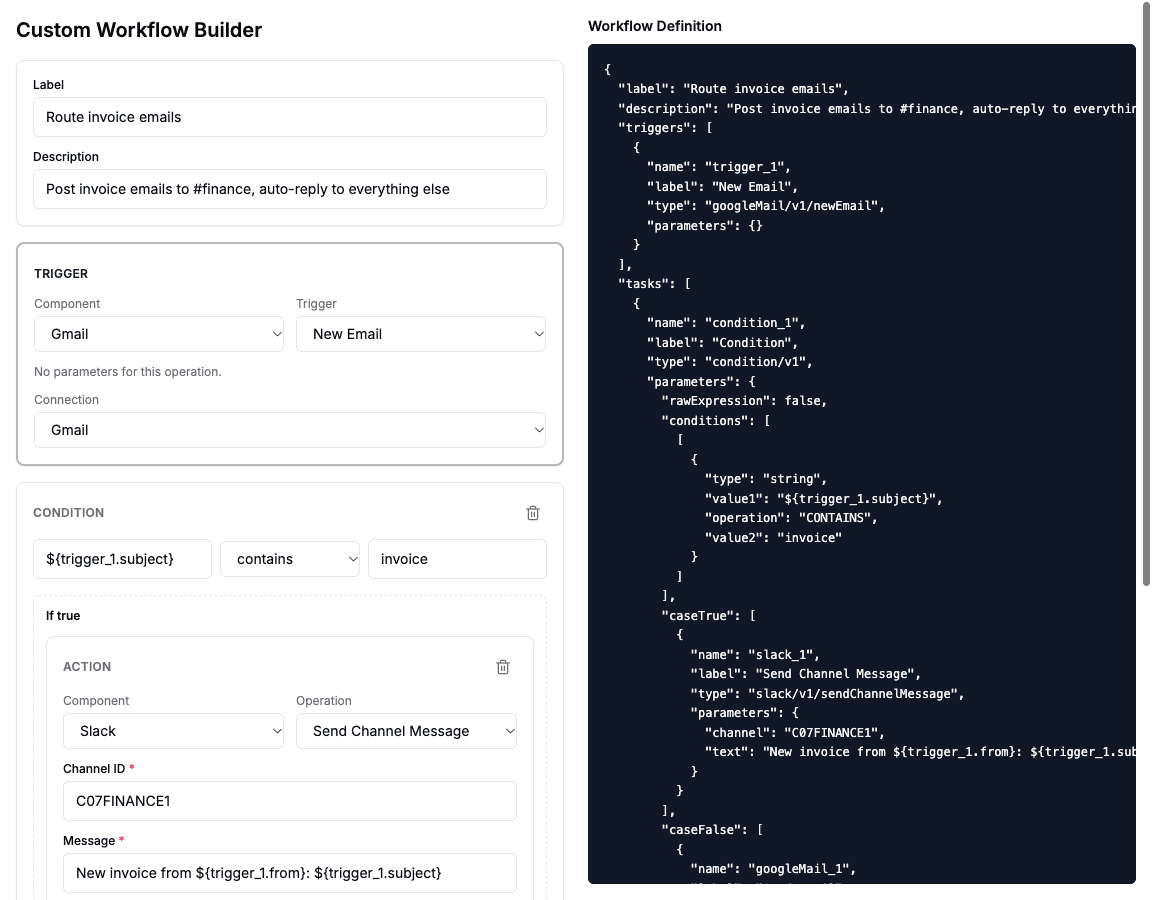
It's deliberately basic. There's no graph library, no drag and drop, no canvas, just form cards stacked top to bottom. That's the point: the demo teaches the contract between your UI and ByteChef, not how to build a diagram editor. Everything visual is ordinary React and shadcn/ui, and you could rebuild it in any design system you like.
Under the hood the page is three files:
| File | Job |
|---|---|
catalog.ts | Which components, triggers, actions and fields your builder offers |
definition.ts | The builder state types, and a pure function that renders that state into ByteChef JSON |
page.tsx | The UI, plus the save flow that calls the embedded API |
Let's build a real workflow with it and follow the data through each file.
Step 1: Decide What Your Users Can Build
ByteChef has hundreds of components. Your builder doesn't have to offer them. The sample app's catalog.ts is a small, hardcoded list of exactly what this product supports, Gmail and Slack, with only the fields worth asking for:
export const COMPONENTS: CatalogComponent[] = [
    {
        name: 'googleMail',
        label: 'Gmail',
        triggers: [{name: 'newEmail', label: 'New Email', fields: []}],
        actions: [
            {
                name: 'sendEmail',
                label: 'Send Email',
                fields: [
                    {key: 'to', label: 'To (comma-separated)', kind: 'stringArray', required: true},
                    {key: 'subject', label: 'Subject', kind: 'string', required: true},
                    {key: 'bodyType', label: '', kind: 'hidden', defaultValue: 'TEXT'},
                    {key: 'body', label: 'Body', kind: 'string', required: true},
                ],
            },
            // getEmail, searchEmail ...
        ],
    },
    {
        name: 'slack',
        label: 'Slack',
        triggers: [{name: 'anyEvent', label: 'Any Event', fields: []}],
        actions: [/* sendChannelMessage, sendDirectMessage, addReaction */],
    },
];
Three details make this catalog more than a list:
namevalues are ByteChef's own.googleMail,newEmailandsendEmailare the component and operation names ByteChef knows, and they end up in each node'stype. Your labels can say anything; the names must match.keyvalues are ByteChef property names.to,subjectandbodyare Send Email's real inputs, so the values your form collects land on the right parameters.kindcontrols serialization. AstringArrayfield turns"a@x.com, b@x.com"into["a@x.com", "b@x.com"]. Ahiddenfield never appears in the form and is always sent with a fixed value. Here that'sbodyType: "TEXT", a decision your product makes so your users don't have to.
This is where your product's opinions live. Hide the delete actions, fix the email format, rename "Send Channel Message" to "Notify the team". The catalog is your product surface, and ByteChef doesn't need to know about any of it.
Step 2: Assemble the Steps
Our example workflow is Route invoice emails: when a new email arrives in Gmail, post it to a Slack channel if the subject mentions an invoice, and send an auto-reply otherwise.
The Trigger card picks Gmail → New Email and the user's Gmail connection. Then Add Condition adds a condition card with two branches, and each branch gets its own Add Action:
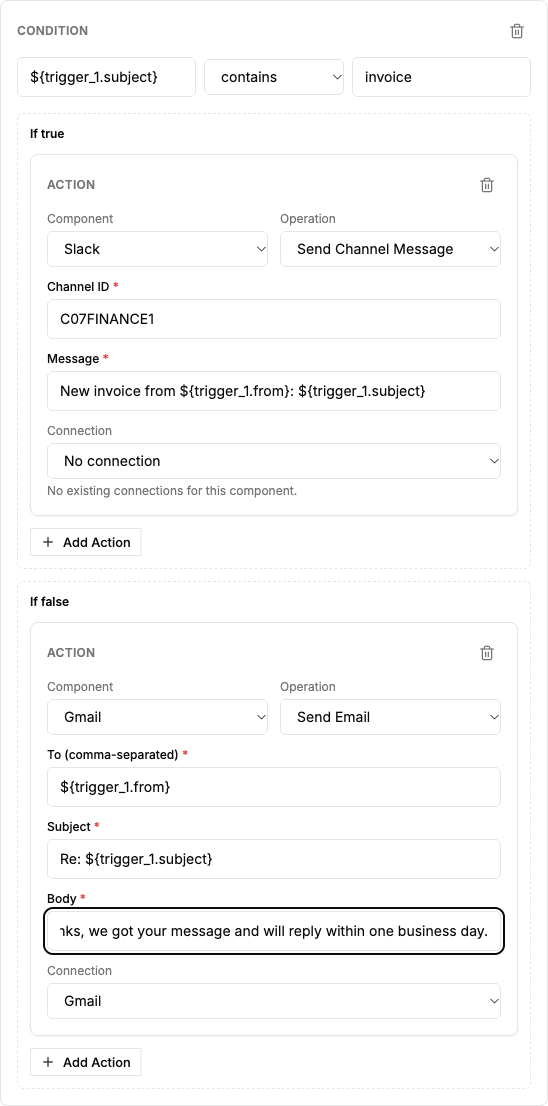
The condition compares ${trigger_1.subject} against invoice with contains. That ${...} syntax is ByteChef's own reference expression: trigger_1 is the name the builder gives the trigger node, and subject is a field of the email the Gmail trigger outputs. Actions can use the same references, so the Slack message reads New invoice from ${trigger_1.from}: ${trigger_1.subject} and the auto-reply goes back to ${trigger_1.from}.
The builder doesn't evaluate any of this. It passes the strings through untouched, and ByteChef resolves them at run time. A friendlier builder would offer a "pick a field from the trigger" menu instead of making users type expressions, and it would produce exactly the same strings.
All of this lives in one useState:
interface BuilderState {
    label: string;
    description: string;
    trigger?: TriggerState; // componentName, operation, parameters, connectionId
    steps: StepState[]; // ActionStepState | ConditionStepState (with caseTrue / caseFalse)
}
Notice that the state is your shape, not ByteChef's. Connection IDs sit right next to parameters, steps have client-side IDs for React keys, and condition branches are just arrays of actions. You only convert to ByteChef's shape at the edge.
Step 3: Render the Workflow Definition
That conversion is buildWorkflowDefinition(state) in definition.ts, a pure function with no I/O that the page runs through useMemo on every change. That's why the JSON panel updates as you type. For our example it produces:
{
    "label": "Route invoice emails",
    "description": "Post invoice emails to #finance, auto-reply to everything else",
    "triggers": [
        {
            "name": "trigger_1",
            "label": "New Email",
            "type": "googleMail/v1/newEmail",
            "parameters": {}
        }
    ],
    "tasks": [
        {
            "name": "condition_1",
            "label": "Condition",
            "type": "condition/v1",
            "parameters": {
                "rawExpression": false,
                "conditions": [
                    [
                        {
                            "type": "string",
                            "value1": "${trigger_1.subject}",
                            "operation": "CONTAINS",
                            "value2": "invoice"
                        }
                    ]
                ],
                "caseTrue": [
                    {
                        "name": "slack_1",
                        "label": "Send Channel Message",
                        "type": "slack/v1/sendChannelMessage",
                        "parameters": {
                            "channel": "C07FINANCE1",
                            "text": "New invoice from ${trigger_1.from}: ${trigger_1.subject}"
                        }
                    }
                ],
                "caseFalse": [
                    {
                        "name": "googleMail_1",
                        "label": "Send Email",
                        "type": "googleMail/v1/sendEmail",
                        "parameters": {
                            "to": ["${trigger_1.from}"],
                            "subject": "Re: ${trigger_1.subject}",
                            "bodyType": "TEXT",
                            "body": "Thanks, we got your message and will reply within one business day."
                        }
                    }
                ]
            }
        }
    ]
}
That's the whole contract. Read it once and you can generate it from any UI:
triggersandtasksare arrays of nodes. Each node has a uniquename(how other nodes reference it), a humanlabel, atypeand itsparameters.typeiscomponent/version/operation, sogoogleMail/v1/sendEmailmeans "version 1 of the Gmail component, Send Email action". Flow controls like the condition leave the operation off:condition/v1.- Flow controls nest. The condition's
caseTrueandcaseFalseare task arrays of their own, so the JSON tree mirrors the branches in your UI.conditionsis a list of OR groups, each a list of AND comparisons. The builder only ever writes one comparison, but the format allows more. - Parameters are typed.
tois an array because the field wasstringArray; blank optional fields are simply omitted.
Node Names Have to Be Stable
The builder names nodes with a per-component counter: slack_1, googleMail_1, condition_1. One subtle detail is visible in the JSON above. The condition is called condition_1 even though it comes before its branches, because the code builds a condition's branch actions first and takes the condition's own name last.
That order matters because names are reused later. Step 5 binds connections by node name, and it gets those names from a second function, collectConnectionBindings, which walks the state in exactly the same order as the serializer. If the two ever disagree, a connection gets bound to the wrong node. In a production builder you'd store the node name on each step when it's created, so the serializer and the binder read the same value instead of each recounting.
Step 4: Let Users Pick Their Connections
Each trigger and action card has a Connection dropdown. It's filled by one call per component:
// GET /api/embedded/v1/components/{componentName}/connections
const connections = await fetchComponentConnections('googleMail'); // [{id, name}, ...]
This lists the connections the connected user already has for that component. The JWT from part one scopes the call, so each user only ever sees their own accounts. Our Gmail cards list the user's Gmail connection. The Slack card shows No existing connections for this component, because this user hasn't connected Slack yet. We'll leave it that way on purpose to see what ByteChef does with a node that has no connection.
Notice that connections are not part of the definition JSON. The definition says what to do; which account to do it with is stored separately for each node. That separation is what lets one definition (a template, for example) run against thousands of users' accounts.
Step 5: Save and Bind
Save Workflow runs the whole server-side flow in page.tsx:
const workflowUuid = await createBuilderWorkflow(buildWorkflowDefinition(state));

for (const binding of collectConnectionBindings(state)) {
    const response = await bindWorkflowNodeConnection(
        workflowUuid,
        binding.nodeName, // e.g. "googleMail_1"
        binding.componentName, // e.g. "googleMail"
        binding.connectionId
    );

    if (!response.ok) {
        failedBindings.push(binding.nodeName);
    }
}
The two helpers are thin wrappers around the embedded public API. Every request carries the connected user's JWT in Authorization and the target environment in X-Environment:
| Call | Endpoint | What it does |
|---|---|---|
createBuilderWorkflow | POST /api/embedded/v1/automation/workflows with {definition} | Stores the definition as a new workflow in the user's own project and returns its UUID |
bindWorkflowNodeConnection | PUT /api/embedded/v1/automation/workflows/{uuid}/workflow-nodes/{nodeName}/connection/{connectionKey} with {connectionId} | Attaches one of the user's connections to one node |
A few things worth knowing about these two calls:
- Each user gets a project automatically. The workflow lands in the connected user's personal automation project for that environment, which ByteChef creates the first time it's needed. Your app never manages projects.
definitionis a string. The body is{"definition": "<the JSON above, stringified>"}, the same format ByteChef's own editor stores.- The connection key is the component name. For single-connection components like Gmail and Slack, the key is simply
googleMailorslack. - Binding is best-effort. If one bind fails, the workflow is already saved, so the builder reports which nodes failed instead of pretending the whole save failed. Our Slack node is never bound, because there was no connection to choose.

What ByteChef Sees
Here's the best proof that your builder speaks ByteChef: click View workflow. It opens /automations/{uuid}, which embeds ByteChef's own editor for that workflow, and your JSON shows up as a regular graph. The Gmail trigger, the condition with its TRUE and FALSE branches, the Slack and Gmail actions, with the node names your builder chose:
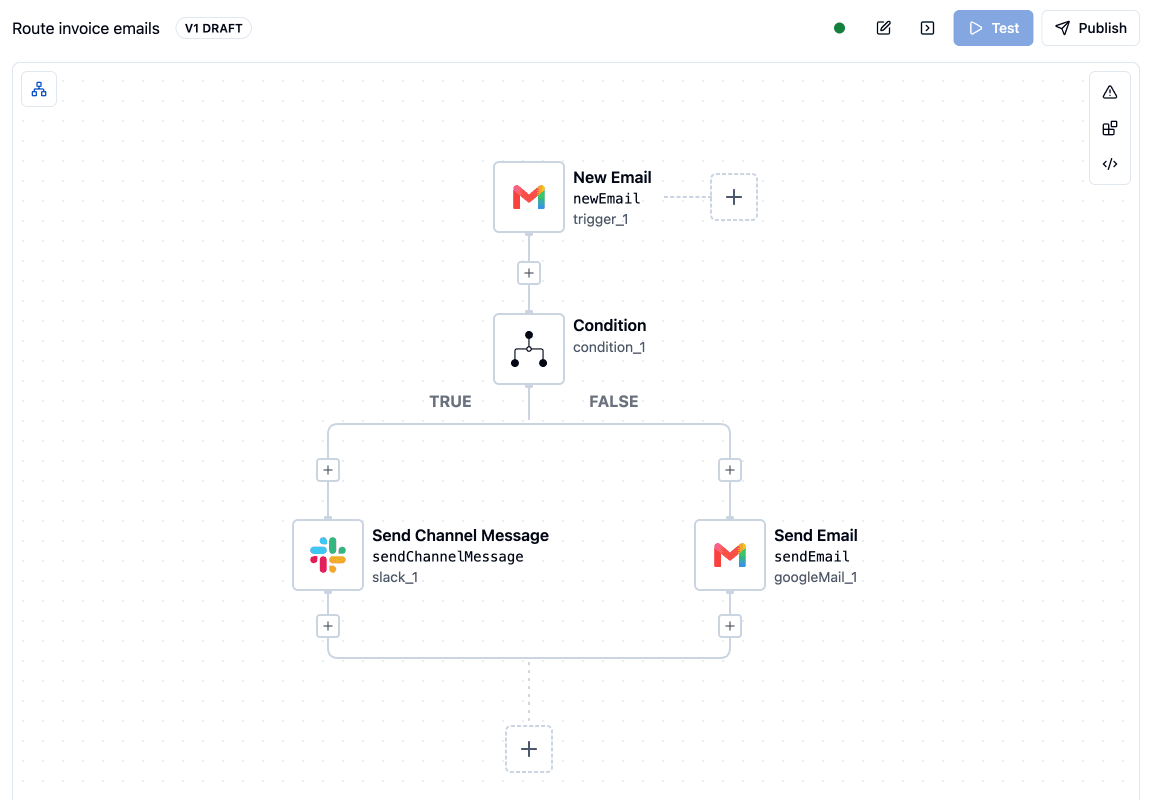
From here on it's an ordinary ByteChef workflow. Click the Gmail action and its Connection tab already shows the Gmail account your builder bound. Click the Slack action and you get the gap we left on purpose: a required Slack connection with a Create Connection button, plus an issue badge in the panel header.
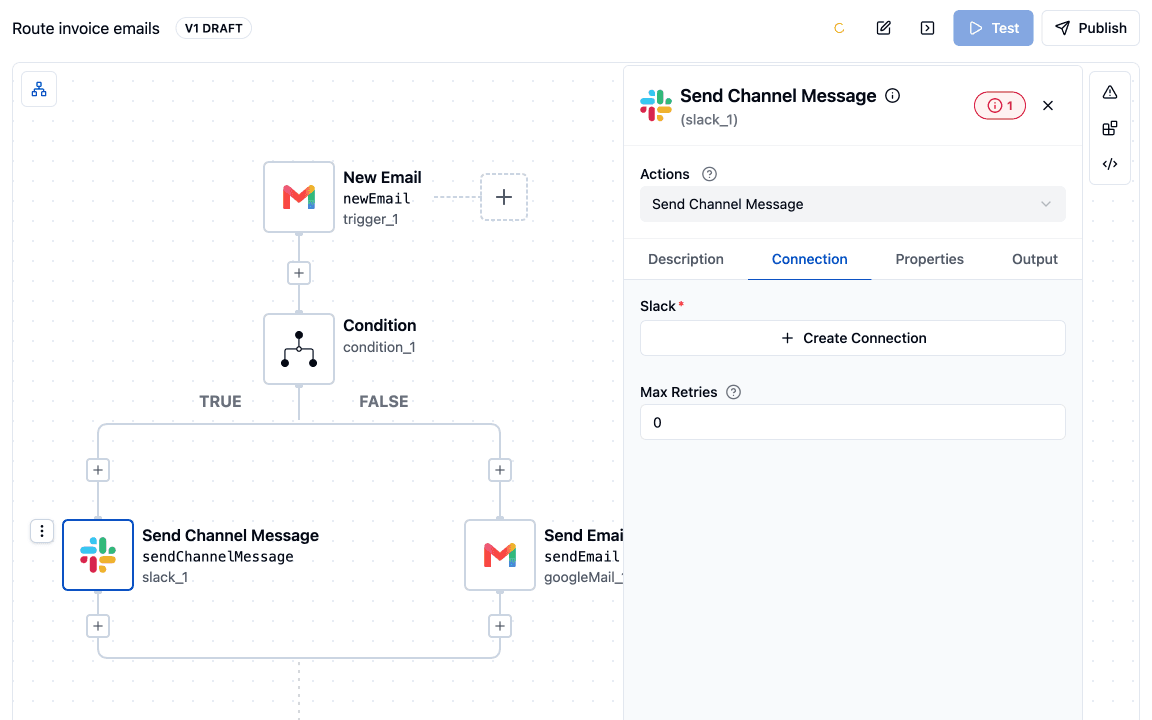
This is the safety net behind a minimal builder. Your UI can be as forgiving as you want, and ByteChef still validates the result. The sample's catalog shows why that matters. Gmail's New Email trigger has a required Topic Name (the Pub/Sub topic Gmail pushes notifications to), and the catalog never asks for it, which is why the trigger card says No parameters for this operation. ByteChef doesn't guess a value. Without one, the trigger has nowhere to subscribe, and the editor's property panel marks it as required. A production catalog would ask for every required property of the operations it offers, or fill them in as hidden fields.
From Draft to Running
Back on Automations, the new workflow is in the list as a DRAFT with its toggle disabled:
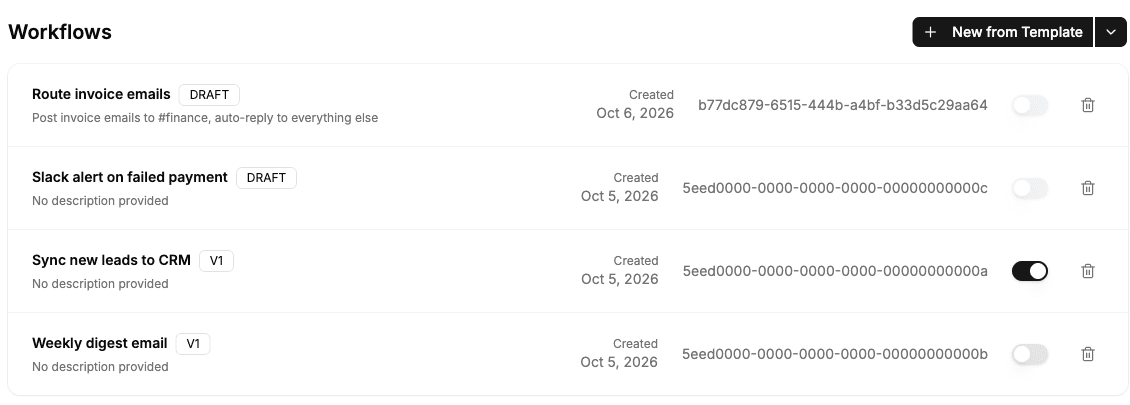
Saving creates a draft. Two more steps make it run, and both are part of the same API:
// 1. Freeze the current definition as a version (V1, V2, ...)
await fetchWithAuth(`/api/embedded/v1/automation/workflows/${workflowUuid}/publish`, {
    method: 'POST',
    headers: {'Content-Type': 'application/json'},
    body: JSON.stringify({description: 'First version'}),
});

// 2. Turn it on (DELETE to turn it off)
await fetchWithAuth(`/api/embedded/v1/automation/workflows/${workflowUuid}/enable`, {method: 'POST'});
The sample app does these steps in ByteChef's editor (the Publish button) and in the list (the toggle, which unlocks once a version exists). A custom builder can fold them into its own UI: a single Activate button that publishes and enables in one click, for example. Enabling switches the trigger on, so from then on new mail starts runs, and every run executes on the user's bound connections.
A few more calls round out the lifecycle:
GET /automation/workflows/{uuid}returns a workflow with its current definition, andPUT /automation/workflows/{uuid}replaces the definition. Together they let your builder support "edit". Your builder needs to parse ByteChef's JSON back into its own state, or store its own state next to the UUID. Re-bind connections after a structural edit, since node names can change.DELETE /automation/workflows/{uuid}removes it.GET /automation/workflowslists the user's workflows, which is what powers the Automations page.
Every one of these also exists in a server-to-server form under /{externalUserId}/automation/workflows/..., authenticated by your backend instead of the user's JWT. Use those when workflows should be created from your backend, for example when you provision a default automation the moment a customer signs up.
Hardening the Demo for Production
The sample builder is a teaching tool, and its code says so. If you build on it, these are the gaps to close first:
- Validate before saving. The demo leaves out blank fields and lets the server reject them. A real builder should block Save until required fields are filled in, including the ones the catalog currently skips, like New Email's Topic Name.
- Store node names on steps. Instead of regenerating names in two places, assign
slack_1when the step is created and keep it in state. That makes bindings and edits stable. - Offer data pills, not expressions. Generate
${trigger_1.subject}from a field picker built from the trigger's output, rather than asking users to type it. - Handle missing connections in your UI. When a component has no connection, open the ConnectDialog right there, so users never need ByteChef's editor to finish the job.
- Grow the catalog on purpose. Each new operation means adding its required fields and their types. Start with the few actions your users really need.
What You Own, What ByteChef Owns
This option draws the line further toward your side than anything else in the series:
- You own the entire authoring experience: the catalog of what's possible, the forms, the branching UI, the connection picker, the wording, and the function that turns your state into ByteChef's JSON.
- ByteChef owns everything after the JSON: validation, storage and versioning, per-user projects, connection storage and OAuth refresh, trigger registration, and the engine that executes every run.
Even at maximum control, you're not building an iPaaS. You're building a front end, a narrower and on-brand way to say what should happen, over ByteChef's execution layer. The moment you save, it's a real ByteChef workflow, indistinguishable from one built in ByteChef's editor, copied from a template or generated from a prompt.
Seven Parts In
Here's the series so far, from connecting accounts to authoring whole workflows:
- Connect your users' apps (the JWT and ConnectDialog everything rests on).
- Act on those connected apps directly with the ComponentKit.
- Chat with an AI assistant that uses the ComponentKit's tools.
- Trigger their workflows from your product's events.
- Call a workflow like a synchronous API.
- Agent over MCP: the same tools, discovered through an open protocol.
- Author workflows in a builder you designed yourself (this part).
The first six parts put ByteChef's pieces inside your product. This one keeps ByteChef entirely behind the API. Both rest on the same foundation: one JWT per connected user, connections they own, and an engine you don't have to run.
Following along? Run the embedded sample app, connect Gmail under Integrations, then open Automations → New from Custom Workflow Builder. Build a step or two, watch the JSON update, save, and click View workflow to see it in ByteChef.
Subscribe to the ByteChef Newsletter
Get the latest guides on complex automation, AI agents, and visual workflow best practices delivered to your inbox.