22 min read
Ivica Čardić
TL;DR: New from Embedded Workflow Builder in the embedded sample app does two things. First it creates a workflow in the connected user's own project with
POST /api/embedded/v1/automation/workflows. Then it opens that workflow in ByteChef's own editor, rendered inside your page by one SDK component:<EmbeddedWorkflowBuilder baseUrl environment jwtToken workflowUuid />from@bytechef/embedded. The component is an iframe. It loadsworkflow-builder.html#/embedded/builder/{uuid}from your ByteChef host and hands it the user's JWT overpostMessage, never in the URL. Inside, the user gets the real canvas: triggers, actions, flow controls, data pills, connections, Test and Publish. You choose which components appear, whether users may create connections, and where the editor sits in your layout. This is part eleven of the series.
In part ten a single sentence became a finished workflow, and the last step was always the same: open the result in the editor so the user can review it. Templates (part eight) and chat (part nine) end there too. Even the workflows from your own custom builder show up there when you click View workflow.
That editor is the subject of this part. New from Embedded Workflow Builder skips the template, the agent and your own forms, and puts the user straight onto ByteChef's canvas. It's the option for users who already think in triggers and steps, and for products that want to offer "build anything" without building a workflow editor.
Open Automations in the sample app and expand the split button next to New from Template:
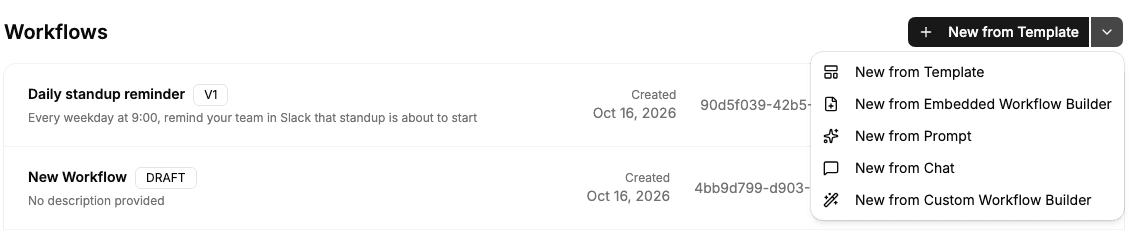
All five entries end in the same place, a workflow in the connected user's own project. They differ in who does the authoring:
| Option | The user... | Best when |
|---|---|---|
| New from Template (part eight) | Picks a workflow you built | You know the common automations up front |
| New from Embedded Workflow Builder (this part) | Builds it on ByteChef's canvas | The user is comfortable with visual builders and needs the full catalog |
| New from Prompt (part ten) | Writes one description, gets one finished workflow | The request is short and unambiguous |
| New from Chat (part nine) | Talks it through with an agent | The request is fuzzy, or needs the user's input along the way |
| New from Custom Workflow Builder (part seven) | Fills in a UI you designed | You want full control of the experience |
The embedded builder is the most powerful option for the user and one of the cheapest for you. The user gets everything ByteChef's own editor can do. You write a create call and render one component.
Here's the whole round trip in the sample app:
POST /api/embedded/v1/automation/workflows with a workflow definition. ByteChef stores it in the user's personal project and answers with the new workflow's UUID./automations/{uuid}.EmbeddedWorkflowBuilder, which loads ByteChef's editor in an iframe and authenticates it with the user's JWT.Steps 1 to 3 are yours: an ordinary dialog and one fetch. Steps 5 and 6 are ByteChef's. Let's take them in order.
The dialog lives in src/app/automations/components/create-workflow-dialog.tsx. It's a react-hook-form dialog with two fields:
const formSchema = z.object({
    label: z.string().min(1, 'Label is required'),
    description: z.string(),
});
Label is required, Description is optional, and the submit button reads Creating... while the request runs. On submit it calls createWorkflow from src/lib/api.ts:
export async function createWorkflow(payload: CreateWorkflowPayload): Promise<Response> {
    return fetchWithAuth('/api/embedded/v1/automation/workflows', {
        method: 'POST',
        headers: {'Content-Type': 'application/json'},
        body: JSON.stringify({
            definition: `{
                "label": "${payload.label}",
                "description": "${payload.description}",
                "triggers": [
                    {
                        "label": "Productboard",
                        "name": "trigger_1",
                        "parameters": {},
                        "type": "productboard/v1/newNote"
                    }
                ],
                "tasks": []
            }`,
        }),
    });
}
This is the same endpoint the custom builder used in part seven. The body is {"definition": "..."}, where definition is the workflow JSON as a string. fetchWithAuth is the sample's wrapper from part one: it adds Authorization: Bearer <JWT> and the X-Environment header.
On the wire:
POST /api/embedded/v1/automation/workflows
Authorization: Bearer <connected user's JWT>
X-Environment: DEVELOPMENT
Content-Type: application/json

{"definition": "{\"label\": \"Sync new notes\", \"description\": \"\", \"triggers\": [...], \"tasks\": []}"}HTTP/1.1 200 OK
Content-Type: application/json
"3f6e2a90-..."definition is an empty string, ByteChef stores a workflow labeled New Workflow with no triggers and no tasks. The editor shows a Manual trigger placeholder on an empty workflow, so the user starts on a clean canvas.The sample's create call is a demo shortcut, and it shows:
JSON.stringify do the escaping.A production version is barely longer:
export async function createBlankWorkflow(label: string, description: string): Promise<string> {
    const response = await fetchWithAuth('/api/embedded/v1/automation/workflows', {
        method: 'POST',
        headers: {'Content-Type': 'application/json'},
        body: JSON.stringify({
            definition: JSON.stringify({description, label, tasks: [], triggers: []}),
        }),
    });

    if (!response.ok) {
        throw new Error(`Failed to create workflow: ${response.status}`);
    }

    return response.json();
}
const workflowUuid = await createBlankWorkflow(values.label, values.description);
router.push(`/automations/${workflowUuid}`);Now the user lands on the canvas the moment they click Create.
The page that opens the editor is src/app/automations/[workflowUuid]/page.tsx, and it's the whole integration:
import {EmbeddedWorkflowBuilder} from '@bytechef/embedded';
import {getToken} from '@/lib/api';
import {BYTECHEF_APP_BASE_URL, BYTECHEF_ENVIRONMENT} from '@/lib/config';

export default async function AutomationPage({params}: {params: {workflowUuid: string}}) {
    const {workflowUuid} = await params;

    const jwtToken = await getToken();

    return (
        <EmbeddedWorkflowBuilder
            baseUrl={BYTECHEF_APP_BASE_URL}
            connectionDialogAllowed={true}
            environment={BYTECHEF_ENVIRONMENT}
            jwtToken={jwtToken}
            workflowUuid={workflowUuid}
        />
    );
}
The page is a Next.js server component: it fetches the JWT from the sample's back end while rendering and passes it down. The SDK's build marks the component 'use client', so you can render it from a server component like this without a wrapper.
These are all the props EmbeddedWorkflowBuilder accepts in @bytechef/embedded 0.4.0:
| Prop | Type | Default | What it does |
|---|---|---|---|
jwtToken | string | (required) | The connected user's JWT. Sent to the iframe over postMessage and used for every request the editor makes |
workflowUuid | string | (required) | The workflow to open. Becomes part of the iframe URL |
baseUrl | string | 'https://app.bytechef.io' | Your ByteChef host. Self-hosted installs must set it |
environment | 'DEVELOPMENT' | 'STAGING' | 'PRODUCTION' | 'PRODUCTION' | Which environment's project, connections and settings the editor uses |
includeComponents | string[] | all components | Limits the component palette to these component names, for example ['slack', 'googleMail'] |
connectionDialogAllowed | boolean | (required) | true lets users create connections inside the editor; false limits them to existing ones. The token can still deny it (see Connections) |
That's the complete list. The component has no callbacks or events: there's no onSave, onPublish or onClose. Everything the user does happens inside the iframe and is saved by ByteChef directly. It also has no theme prop; more on that in Theming.
The component renders exactly this:
<div className="absolute inset-0 lg:pl-72">
    <iframe
        src={`${baseUrl}/workflow-builder.html#/embedded/builder/${workflowUuid}`}
        width="100%"
        height="100%"
        style={{border: 'none'}}
        title="Workflow Builder"
    />
</div>
Two details matter for your layout:
pl-72) gap on large screens for the sample's sidebar. In your app they apply only if your stylesheet happens to define the same classes. Wrap the component in a container with position: relative and an explicit height so it fills the area you intend, whatever your CSS does.The iframe URL carries only the workflow UUID. The user's JWT travels a different way, through a two-message handshake between your page and the iframe:
{type: 'EMBED_READY'} to the parent window, addressed only to those origins. If none are configured, it addresses the origin in the iframe's referrer.EMBED_READY, ignores it unless it comes from the origin of baseUrl, and replies with {type: 'EMBED_INIT', params: {connectionDialogAllowed, environment, includeComponents, jwtToken}}, addressed to that origin only.EMBED_INIT only from its parent window and only from an allowed origin. It stores the token and environment for the session, then loads the workflow. Until then it shows a loading state.From then on, every request the editor makes to /api/embedded/v1/, ByteChef's internal API or GraphQL carries Authorization: Bearer <JWT> and X-Environment. The editor doesn't have a ByteChef login of its own; the token is the session, and it's scoped to one connected user in one environment. Looking up the workflow, listing connections, saving, testing and publishing all resolve the user from the token and only ever touch that user's project.
The SDK re-sends EMBED_INIT whenever its props change after the iframe is ready. Pass a new jwtToken and the editor swaps in the new token without reloading the iframe, then refetches its data with it. Since every change is already saved, the user loses nothing.
The sample doesn't use this. Its page fetches a token once on the server, and the sample back end signs tokens that live for an hour, so an editor left open longer than that starts failing. The fix is a small client wrapper that keeps the token fresh:
'use client';

import {EmbeddedWorkflowBuilder} from '@bytechef/embedded';
import {useEffect, useState} from 'react';

export default function WorkflowEditor({initialToken, workflowUuid}: WorkflowEditorPropsI) {
    const [jwtToken, setJwtToken] = useState(initialToken);

    useEffect(() => {
        const interval = setInterval(async () => setJwtToken(await fetchFreshToken()), 5 * 60 * 1000);

        return () => clearInterval(interval);
    }, []);

    return (
        <div style={{height: 'calc(100vh - 64px)', position: 'relative'}}>
            <EmbeddedWorkflowBuilder
                baseUrl={BYTECHEF_APP_BASE_URL}
                environment={BYTECHEF_ENVIRONMENT}
                jwtToken={jwtToken}
                workflowUuid={workflowUuid}
            />
        </div>
    );
}
fetchFreshToken is whatever calls your own token endpoint. Refresh well before the token's exp.
Set BYTECHEF_EMBEDDED_ALLOWED_PARENT_ORIGINS on your ByteChef server (property bytechef.embedded.allowed-parent-origins) to the exact origins of the apps that embed the editor, comma-separated, with scheme and port and no path or wildcard:
BYTECHEF_EMBEDDED_ALLOWED_PARENT_ORIGINS=https://app.example.com,https://admin.example.comByteChef then does two things. It sends Content-Security-Policy: frame-ancestors with those origins on workflow-builder.html (and the other embeddable pages), so browsers refuse to render the editor inside any other site. And the editor accepts EMBED_INIT only from those origins. When the list is empty, any site can frame the page, and the editor logs a console warning that tells you to set it.
If the editor is blank, the browser console usually says why. A frame-ancestors violation means your app's origin isn't on the list. An editor stuck on its loading state means it never got EMBED_INIT from an allowed origin: check http versus https and the port. If the list is empty and your app sends Referrer-Policy: no-referrer, the editor can't announce itself at all, so set the list.
environment decides which environment the editor works in, and it has to agree with the token. ByteChef verifies the JWT against a signing key registered for the request's environment, and if the token carries the optional numeric environmentId claim, it must match too. A token minted for Development used with environment="PRODUCTION" is rejected. The prop defaults to PRODUCTION; the sample sets it from NEXT_PUBLIC_BYTECHEF_ENVIRONMENT, which defaults to DEVELOPMENT.
The editor is the same canvas ByteChef's own users build with, scoped to one workflow. Here it is on a workflow from part ten:
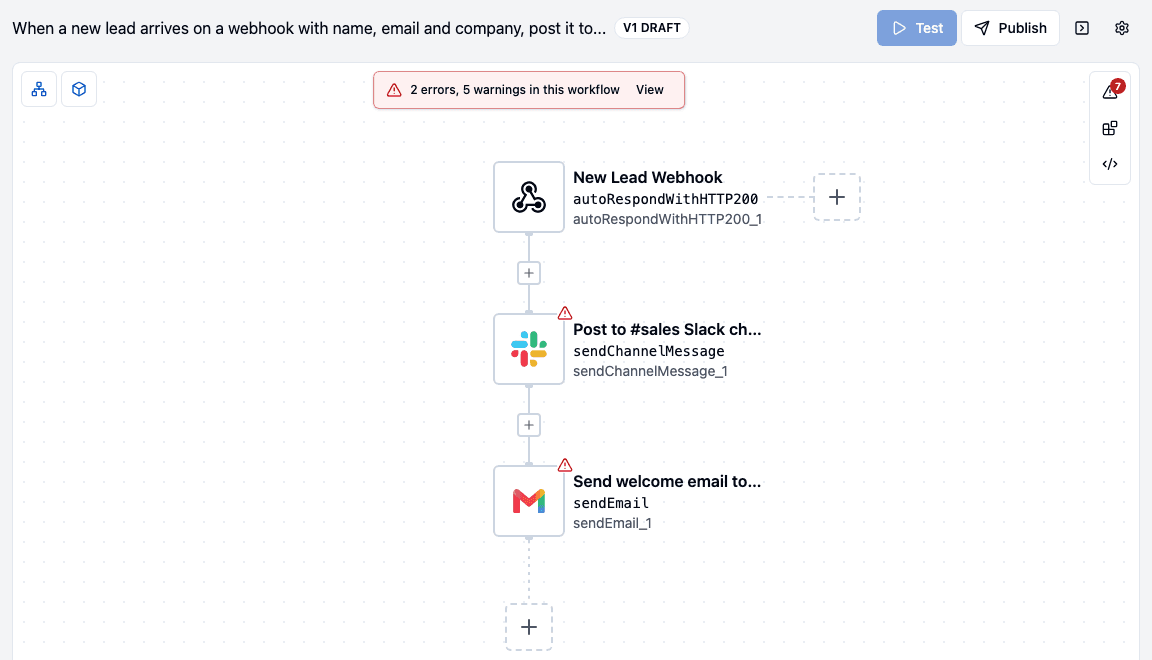
The header has everything a single-workflow editor needs and nothing else:
| Control | What it does |
|---|---|
Workflow label and V<n> DRAFT badge | The workflow's name and the version you're editing. Before the first publish it reads V1 DRAFT; after publishing V1 it reads V2 DRAFT |
| Saving... / Offline | Appears while changes save, or when the browser is offline |
| Test | Runs the workflow. Reads Chat for workflows with a chat trigger, and Stop while a run is in progress |
| Publish | Opens the Publish Project popover (more below) |
| Output (chevron icon) | Opens or closes the test-output panel |
| Settings (gear icon) | One item, Edit, to rename the workflow or change its description |
There's no project sidebar, no workflow switcher and no navigation to the rest of ByteChef. The user can't leave this workflow from inside the iframe; your app owns navigation. Two panels from ByteChef's own editor are also turned off here: the AI Copilot and the workflow inputs panel.
Everything else is the real editor: adding and replacing triggers, actions and flow controls (conditions, loops, branches and the rest), configuring properties, dragging data pills between steps, and the workflow issues banner and panel you saw in part ten. Changes save as the user makes them. There's no Save button; the badge's DRAFT tells the user they're editing the draft, not what's running.
By default the palette lists every component on your ByteChef instance, plus the flow controls. It isn't limited to the integrations you set up under Embedded → Integrations, so a user can add a step for an app you never configured.
Pass includeComponents to narrow it:
<EmbeddedWorkflowBuilder
    // ...
    includeComponents={['googleMail', 'slack', 'hubspot']}
/>
The names are ByteChef component names, the same ones that appear in node types like slack/v1/sendChannelMessage. Flow controls stay available either way.
Treat includeComponents as product design, not as a permission. It shapes what the palette offers. It arrives from your page through postMessage, and ByteChef doesn't check saved workflows against it on the server. Use it to keep the catalog relevant; use your integration setup under Embedded → Integrations and permission expressions for what users are entitled to.
Click a step that needs an account and open its Connection tab. The dropdown lists the connections this user may use in this environment:
No other user's connections ever appear: the server filters the list by the JWT's user and environment.
If there's nothing to pick, the tab shows a Create Connection button that opens ByteChef's connection form right in the iframe. A connection created there belongs to the connected user.
Two things decide whether that button exists. The first is the component's connectionDialogAllowed prop: false hides connection creation, and the user can only pick existing connections. The prop lives in your page, though, and a page is easy to change. For a rule the server enforces, add the optional connectionDialogAllowed claim when you sign the JWT:
const token = jwt.sign(
    {
        connectionDialogAllowed: false,
        sub: externalUserId,
    },
    privateKey,
    {algorithm: 'RS256', expiresIn: '10m', keyid: signingKeyId}
);true: users can create connections in the editor.false: the editor offers only existing connections, and ByteChef rejects any attempt to create one through the API with 403, whatever the page sends.The prop and the claim combine in one direction only. A false prop hides connection creation even when the token allows it; a true prop can't override a token that says false. The sample passes connectionDialogAllowed={true} and its tokens don't carry the claim, so its users can create connections. Its back end does accept a customClaims object in the POST /api/token body, so you can try the claim without changing code.
The claim is per token, not per component. If you want users to create connections in one surface but not another, mint a separate token for each.
Test runs the current draft with the connections chosen on each step, and the output panel opens with the result of every step. It's disabled until the workflow can run, and its tooltip says why, for example Add at least one task. or Pick a Slack connection for "Post to #sales". While a run is in progress the button becomes Stop.
Test runs are real calls. A test that sends a Slack message sends a Slack message from the user's account. That's what makes the test trustworthy, and it's worth saying so in your onboarding.
Publish opens a popover titled Publish Project with an optional Description (up to 256 characters; the placeholder suggests something like Added a Slack notification for new leads). Submitting it does three things:
It's the same operation as POST /api/embedded/v1/automation/workflows/{uuid}/publish from part seven, done from inside the editor. After it, the workflow in your list has a version, and the user keeps editing a new draft. Nothing they change afterwards reaches the running workflow until they publish again.
The editor has no on/off switch. Turning a published workflow on is your app's job, with the same call as in parts seven through ten:
// Turn it on (DELETE to turn it off)
const response = await fetchWithAuth(`/api/embedded/v1/automation/workflows/${workflowUuid}/enable`, {
    method: 'POST',
});
In the sample, the toggle on the Automations list does this, and it stays disabled until the workflow has a version. ByteChef validates the workflow before it enables it. If the published version has validation errors (a step without a required connection, for example), the call fails with 409 and a body like {"invalidWorkflowErrorCount": 2}. The sample turns that into Could not enable the workflow: it has 2 validation error(s). Fix them in the workflow, then enable it again. Enabling a workflow that was never published fails too: publish first.
Keeping the switch outside the iframe is deliberate. Where an automation is turned on, what it's called in your UI, and what you show next to it (last run, error count, owner) are product decisions, and they belong in your list, not in ByteChef's editor.
EmbeddedWorkflowBuilder has no theme prop. The standalone editor renders ByteChef's default light appearance, and your page's CSS can't reach inside the iframe. Here's what you control and what you don't:
includeComponents keeps the palette to the apps your product is about.If you need the editor to match your brand colors, the Automation Hub, the next part's topic, takes a theme and applies it to the same editor when it opens it. For a standalone editor page, plan your surrounding layout so the editor's neutral light look reads as a panel of your product rather than a foreign page.
Every create option in the sample produces the same kind of workflow, and every one of them can end up in this editor. They differ in what you build and what the user does:
| Embedded Workflow Builder | Custom Builder (part 7) | Template (part 8) | Chat (part 9) | Prompt (part 10) | |
|---|---|---|---|---|---|
| Who authors the steps | The user, on ByteChef's canvas | The user, in your forms | You, ahead of time | ByteChef's agent, with the user | ByteChef's agent, alone |
| UI you build | A create dialog and a page | The whole editor and its JSON | A gallery | A chat page (copied component) | A form |
| What the user can build | Anything in the palette | Only what your catalog offers | Only your templates | What the agent builds from your enabled integrations | What the agent builds from your enabled integrations |
| Requires an AI provider | No | No | No | Yes | Yes |
| Connections | Picked or created in the editor | Bound by your code via REST | Bound after copying | Picked or connected in the thread | Picked in the editor afterwards |
| Best for | Power users | Opinionated, narrow products | Common, known automations | Fuzzy requests | Clear, short requests |
Two of these relationships are worth spelling out:
The create call also exists for your back end: POST /api/embedded/v1/{externalUserId}/automation/workflows, authenticated with your environment's API key instead of the user's JWT, with the same {definition} body and the same UUID response. Use it to prepare a workflow before the user arrives, for example a starter automation created during onboarding, then open it with EmbeddedWorkflowBuilder and the user's token. The editor itself always runs with the connected user's JWT.
The sample proves the round trip. Before your users get it, close these gaps:
JSON.stringify. Never interpolate user input into a JSON string.jwtToken before the old one expires; the SDK forwards it without a reload.BYTECHEF_EMBEDDED_ALLOWED_PARENT_ORIGINS. Without it any site can frame the editor, and you'll see the warning in every console.environment to the token. Set the prop explicitly; its default is PRODUCTION.includeComponents. Offer the apps your product supports, not every component on the instance.connectionDialogAllowed: false for users who may only use connections you or their admins provide, and set the prop to match so the UI doesn't offer what the server will refuse.409 validation count with a link back to the editor, and keep the toggle disabled until the workflow has a version.This option moves the most UI to ByteChef's side for the least code on yours:
Your code for the feature is a dialog, one fetch and one component. The most expensive piece of any iPaaS, the visual editor, is a dependency you keep up to date with npm update.
Every option so far assumed you build the surrounding experience: the list, the toggles, the gallery, the buttons. The next part, The Automation Hub, is the opposite: one embedded component that renders a complete end-user automation page, with your template catalog, the user's connections and this same builder inside it, themed to match your product.
Here's the series so far:
Parts seven through eleven are five ways to create the same thing: a real ByteChef workflow in the user's own project. Your own builder gives you the most control, templates the most curation, chat and prompt the least effort, and the embedded builder the most power. Since they all produce the same kind of workflow, they combine freely, and this part's editor is where most of them meet.
Following along? Run the embedded sample app, open Automations → New from Embedded Workflow Builder, give the workflow a label and click Create. Then click its title, replace the trigger with one of your connected apps, add a step, click Test, and Publish it.
Get the latest guides on complex automation, AI agents, and visual workflow best practices delivered to your inbox.