ByteChef Embedded, Part 8: New from Template
On this page
TL;DR: New from Template in the embedded sample app is a gallery of workflows you built and published in ByteChef. The page makes two calls to the embedded REST API:
GET /automation/projectsreturns your catalog, grouped by project, with each template's label, description and the apps it uses, andPOST /automation/workflow-templates/{uuid}/copyclones the chosen template into the connected user's own project and returns the new workflow's UUID. The copy is an ordinary, editable ByteChef workflow. It starts as a draft, and the same bind, publish and enable calls from part seven turn it on. This is part eight of the series.
In part seven your users built a workflow from scratch in a UI you designed. That's the most flexible way to start an automation, and also the slowest. Most users don't want a blank canvas. They want to hear "here's an automation we already built for you, want it?" and click yes.
That's what templates are. You, the vendor, design a handful of great workflows once, in ByteChef. Every customer gets them as a one-click starting point inside your product. Because a template is a real ByteChef workflow, the copy your user gets is too: they can run it as is, tweak it in the embedded editor, or ignore it and build their own.
Where Templates Fit
Open Automations in the sample app. The big button in the top right is New from Template, and its split menu lists every other way to start a workflow:

Templates get the primary slot for a reason. Every other option asks the user to describe an automation, whether on a canvas, in a prompt or in your own form. A template asks them only to choose one. For onboarding, that difference matters: the shortest path from "I just signed up" to "something is running for me" goes through a gallery.
The Gallery at a Glance
Click New from Template and you land on /automations/templates. The page is titled Choose a workflow template and shows one section per catalog project, each with a grid of template cards:
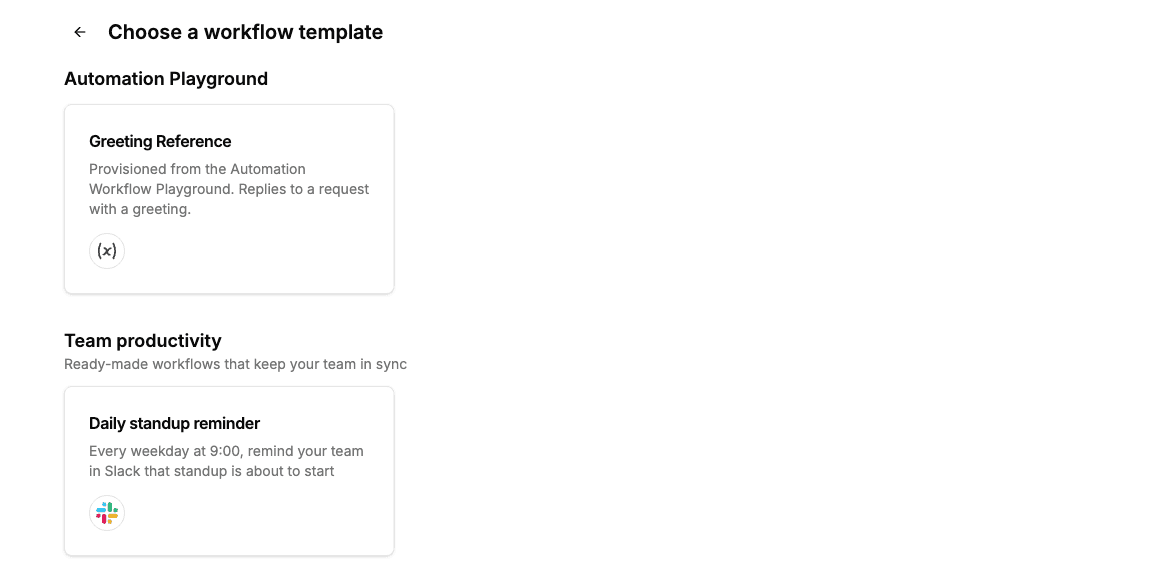
Each card shows three things, all of which come from ByteChef:
- The template's label (Daily standup reminder).
- Its description, written by you when you created the workflow.
- A row of component icons, one per app the workflow uses. The standup reminder posts to Slack, so its card shows the Slack logo.
Each project becomes a section, with its name as the heading and its description underneath (Ready-made workflows that keep your team in sync). Clicking a card copies the template and drops the user into their new workflow. That's the whole user-facing feature. The rest of this post is about what happens on each side of that click, starting with where the templates come from.
Step 1: Build a Template in ByteChef
Templates live in ByteChef, not in your app. You build them in the same ByteChef instance your embedded app talks to, in four steps. Let's build the Daily standup reminder template from the gallery above: every weekday at 9:00, post a reminder to the team's Slack channel.
Open Automation Workflows
In ByteChef, open Embedded and choose Automations from the sidebar. The page is titled Automation Workflows and lists your catalog projects, each with a version badge on the right:
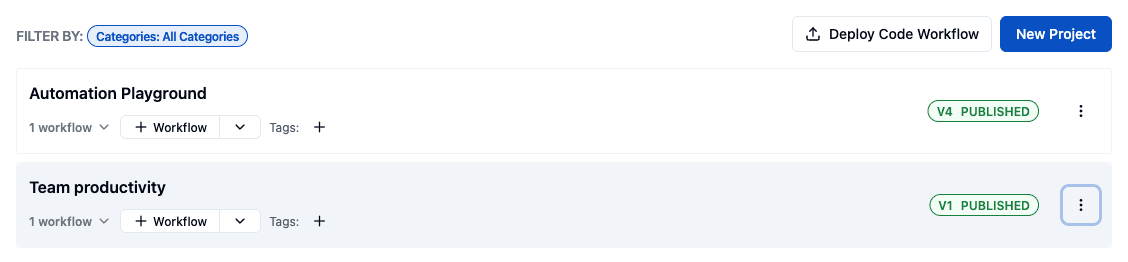
Two buttons sit in the top right. New Project creates an ordinary project whose workflows you build in ByteChef's editor; that's what we'll use. Deploy Code Workflow uploads a code-native project instead, which we'll come back to in Copy or Reference?
This page belongs to your Development environment. It's hidden when you switch ByteChef to Staging or Production, so you author templates in one place. The published catalog isn't tied to an environment, though: connected users in every environment see the latest published version of each project.
Create a Project
A project is a shelf in your gallery. Click New Project:
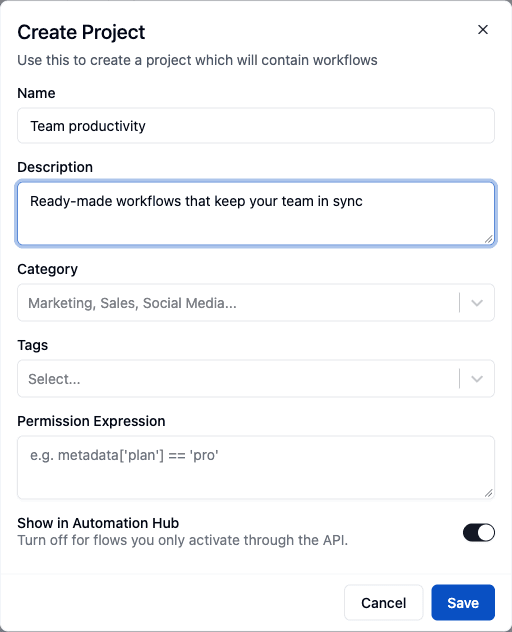
- Name and Description are what your users see as the section heading and subheading, so write them for customers. Group templates the way your customers think: Sales, Support, Team productivity.
- Category and Tags organize projects on this page (the sidebar filters by them). They aren't part of the API response.
- Permission Expression limits who can see the whole project. Leave it empty and every connected user sees it. We'll cover expressions in Who Sees Which Template.
- Show in Automation Hub, on by default, controls whether ByteChef's own embeddable Automation Hub lists the project. Its hint says it all: Turn off for flows you only activate through the API.
Click Save. The project appears in the list with a DRAFT badge.
Add a Workflow
Each workflow in the project becomes one template card. Click + Workflow on the project row:
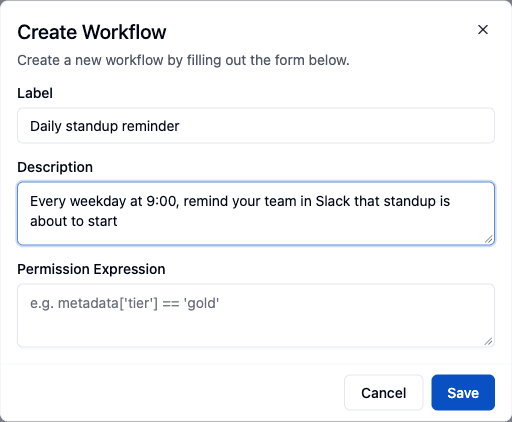
The Label and Description become the card's title and text. The workflow has its own Permission Expression too, so you can hide a single template inside an otherwise public project.
Saving opens the workflow editor. Build the template as you would any ByteChef workflow, on the canvas or, as here, by pasting a definition into the Workflow Code Editor (the </> button on the right edge of the canvas):
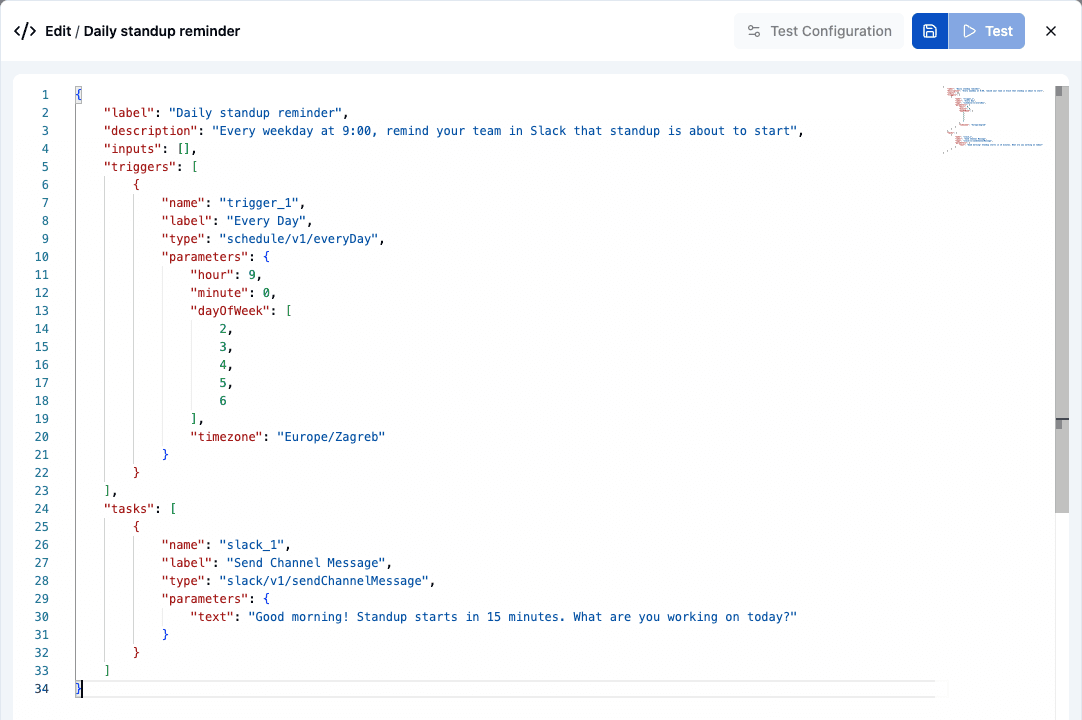
The definition uses the same format as the one from part seven: a Every Day schedule trigger (schedule/v1/everyDay, 9:00, dayOfWeek 2 to 6 for Monday to Friday) and one Slack Send Channel Message task with the reminder text.
Save it and close the code editor. The canvas now shows the trigger and the Slack step, and it also flags two issues:
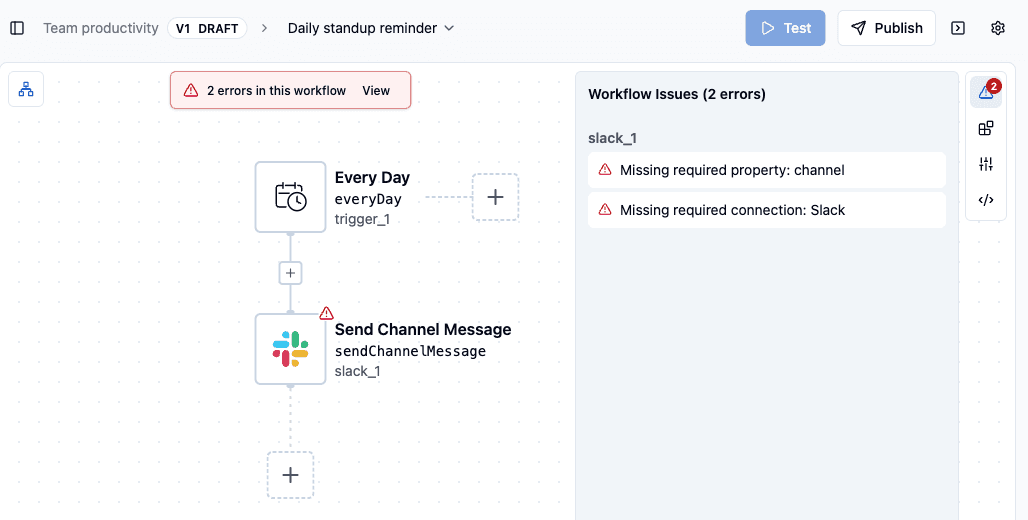
Missing required property: channel and Missing required connection: Slack. In a normal workflow, you'd fix both. In a template, leave them. You can't know which Slack workspace each customer uses, or which channel their team stands up in. Those are exactly the decisions the customer makes after copying. A good template fills in everything that's the same for every customer (the schedule, the message, the structure) and leaves the account-specific parts blank.
Publish the Project
Templates aren't visible until the project is published. Back on Automation Workflows, open the project's ⋮ menu:
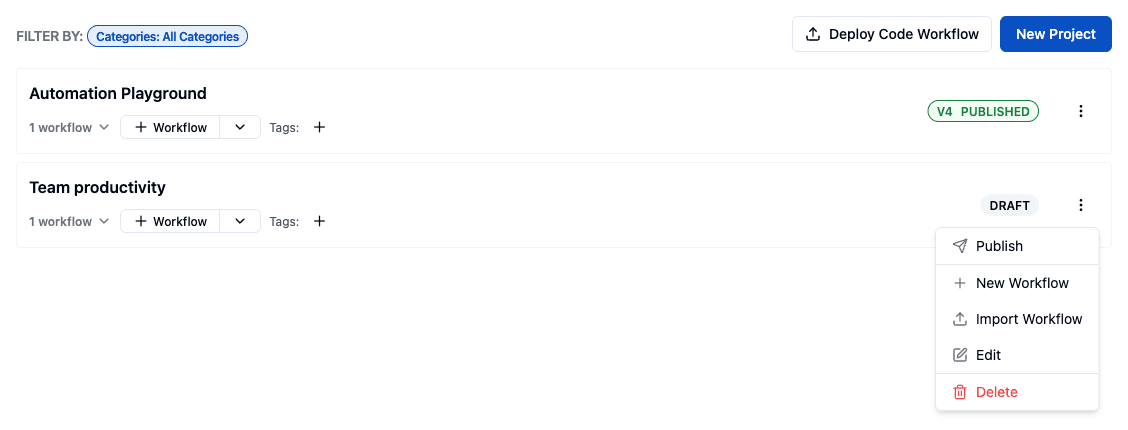
Click Publish. There's no confirmation step and no validation gate, which is why the open issues above don't block it, and the badge changes from DRAFT to V1 PUBLISHED (as in the first screenshot of this section). Refresh the sample app's gallery and the Team productivity section is there.
Publishing creates a version, and your users always get the last published version of a project, never your work in progress. Keep editing the draft as much as you like. Nothing changes for customers until you publish again as V2, V3 and so on. Two more details:
- Unpublished projects still appear, but empty. A project that was never published comes back from the API with no templates, so a gallery can show a project heading with No workflow templates available in this project. under it. Publish before you tell customers to look.
- Copies don't follow new versions. Publishing V2 changes what new copies get. Workflows your users already copied stay as they were. (References behave differently; see below.)
Step 2: Fetch the Catalog
The gallery page loads the catalog with a single call when it mounts:
export async function fetchAutomationWorkflowProjects(): Promise<AutomationWorkflowProject[]> {
    const response = await fetchWithAuth('/api/embedded/v1/automation/projects', {
        method: 'GET',
    });

    if (!response.ok) {
        throw new Error(`Failed to fetch automation workflow projects: ${response.status}`);
    }

    return response.json();
}
fetchWithAuth is the same helper the whole sample app uses. It sends the connected user's JWT from part one in Authorization and the environment in X-Environment (with no header, ByteChef assumes PRODUCTION). The JWT matters more here than it seems, because the catalog is filtered per user, as we'll see in a moment.
For the catalog we just built, the Team productivity project comes back like this (the SVG icon is shortened):
[
    {
        "id": 1128,
        "name": "Team productivity",
        "description": "Ready-made workflows that keep your team in sync",
        "automationHubVisible": true,
        "kind": "COPY",
        "workflowTemplates": [
            {
                "id": "6a62a705-2225-445d-a91a-048607332571",
                "label": "Daily standup reminder",
                "description": "Every weekday at 9:00, remind your team in Slack that standup is about to start",
                "components": [
                    {
                        "name": "slack",
                        "title": "Slack",
                        "icon": "<svg xmlns=\"http://www.w3.org/2000/svg\" ...>...</svg>"
                    }
                ],
                "inputs": []
            }
        ]
    }
]
Here's what each field gives you:
| Field | What it is |
|---|---|
id (project) | The project's numeric ID |
name, description | The project's name and description, ready to use as a section heading |
automationHubVisible | The Show in Automation Hub switch. ByteChef doesn't filter on it; it's a hint for your UI |
kind | COPY for ordinary projects, REFERENCE for code-native projects (more on that below) |
workflowTemplates[].id | The template's workflow UUID, the value you pass to the copy call |
workflowTemplates[].label, description | The card's title and text |
workflowTemplates[].components | The apps the workflow uses: name, title and an SVG icon |
workflowTemplates[].inputs | Workflow inputs the template declares: name, label, type, required |
Two of these are worth a closer look.
components lists the workflow's tasks, not its trigger. ByteChef walks the workflow's tasks, removes duplicates and looks up each component's title and icon. The trigger isn't included, so the standup template shows Slack but not the Schedule trigger that starts it. That's harmless for a schedule, but a "New HubSpot deal to Slack" template would also show only Slack. If the trigger's app matters to your users, put it in the label or description.
icon is raw SVG markup, not a URL. You don't need to host or proxy icons. The sample app turns each one into a data URL:
<img
    src={`data:image/svg+xml;utf8,${encodeURIComponent(component.icon)}`}
    alt={component.title || component.name}
    className="size-full"
/>
Who Sees Which Template
Every connected user calls the same endpoint, but they don't all get the same catalog. Both projects and individual workflows can carry a Permission Expression, a Spring Expression Language (SpEL) condition that ByteChef evaluates against the connected user before returning anything. The placeholders in the two dialogs show the idea:
metadata['plan'] == 'pro'
metadata['tier'] == 'gold'
The expression can read the connected user's metadata, externalId, email, name and environment. That lets you build tiered catalogs without any code in your app:
- An Enterprise automations project with
metadata['tier'] == 'enterprise'shows up only for enterprise customers. - A single beta workflow inside a public project can be gated on
metadata['plan'] == 'beta'. - A project can be limited to one environment, for example only Development while you test it.
The rules are strict on purpose. An empty expression means everyone sees the item. Anything else has to evaluate to true. If it evaluates to false, or the expression fails, the item is hidden, so a typo hides a template rather than leaking it. The same check runs again on copy: a user can't copy a template they can't see by guessing its UUID. ByteChef answers as if the template doesn't exist.
Show in Automation Hub is a different kind of switch. It controls whether ByteChef's own embeddable Automation Hub lists the project. The REST API returns hidden projects too, with automationHubVisible: false, so a custom gallery can decide for itself. You might hide a project from the Hub and offer it only from a specific place in your product, like a "Recommended for you" panel after setup.
Step 3: Render the Gallery
With the data in hand, the gallery is plain React. The sample app's app/automations/templates/page.tsx keeps four pieces of state:
const [projects, setProjects] = useState<AutomationWorkflowProject[] | undefined>();
const [isLoading, setLoading] = useState(true);
const [error, setError] = useState<string | null>(null);
const [creatingWorkflowId, setCreatingWorkflowId] = useState<string | null>(null);
It renders one <section> per project and one shadcn/ui Card per template, in a grid that goes from one to three columns as the screen widens. creatingWorkflowId drives the only interesting UI state: while a copy is in flight, the clicked card's description changes to Creating workflow... and every card is disabled with aria-disabled, so an impatient double click can't start two copies.
There's nothing ByteChef-specific in the markup. Cards, a list, a search box, an onboarding checklist that suggests one template: use whatever fits your product. The API gives you data, not UI.
Step 4: One Click, One Copy
Clicking a card runs handleSelectWorkflowTemplate:
const handleSelectWorkflowTemplate = (workflowTemplateUuid: string) => {
    setCreatingWorkflowId(workflowTemplateUuid);
    setError(null);

    copyWorkflowTemplate(workflowTemplateUuid)
        .then((workflowUuid) => {
            router.push(`/automations/${workflowUuid}`);
        })
        .catch(() => {
            setError('Failed to create a workflow from the selected template');
            setCreatingWorkflowId(null);
        });
};
And copyWorkflowTemplate is one POST:
export async function copyWorkflowTemplate(workflowUuid: string): Promise<string> {
    const response = await fetchWithAuth(
        `/api/embedded/v1/automation/workflow-templates/${workflowUuid}/copy`,
        {method: 'POST'}
    );

    if (!response.ok) {
        throw new Error(`Failed to copy workflow template: ${response.status}`);
    }

    const newWorkflowUuid = (await response.text()).trim();

    // The endpoint may return the uuid as a JSON string or as plain text.
    return newWorkflowUuid.startsWith('"') && newWorkflowUuid.endsWith('"')
        ? newWorkflowUuid.slice(1, -1)
        : newWorkflowUuid;
}
The response body is the new workflow's UUID as a JSON string ("9adccb49-..."). The sample reads it as text and strips the quotes, which also works if a proxy in between returns plain text.
That single call does more than it looks like:
- It copies the last published version. ByteChef finds the template in the user's own (permission-filtered) catalog, takes the definition of its latest published version and stores it unchanged as a new workflow. Your drafts never leak into a copy.
- It keeps the label and description. The new workflow is called Greeting Reference, not Greeting Reference (Copy), because to your user it's simply their automation.
- It lands in the user's own project. Each connected user gets a personal project per environment, created by ByteChef the first time it's needed, exactly like the workflows from the custom builder. Your app never manages projects.
- It remembers where the copy came from. ByteChef stores the template's UUID next to the new workflow, and allows one copy of each template per user. Clicking the same card a second time fails, and the sample shows its error banner. A production gallery would mark templates the user already has, for example with an Added badge that opens the existing copy instead.
What the User Gets
After the copy, the sample app routes to /automations/{uuid}. That page renders ByteChef's embedded editor for the new workflow, using the EmbeddedWorkflowBuilder component from @bytechef/embedded:
<EmbeddedWorkflowBuilder
    baseUrl={BYTECHEF_APP_BASE_URL}
    connectionDialogAllowed={true}
    environment={BYTECHEF_ENVIRONMENT}
    jwtToken={jwtToken}
    workflowUuid={workflowUuid}
/>
For the screenshots below we clicked the Greeting Reference card from the Automation Playground project. The user sees the template's steps exactly as you built them, now in their own workspace:
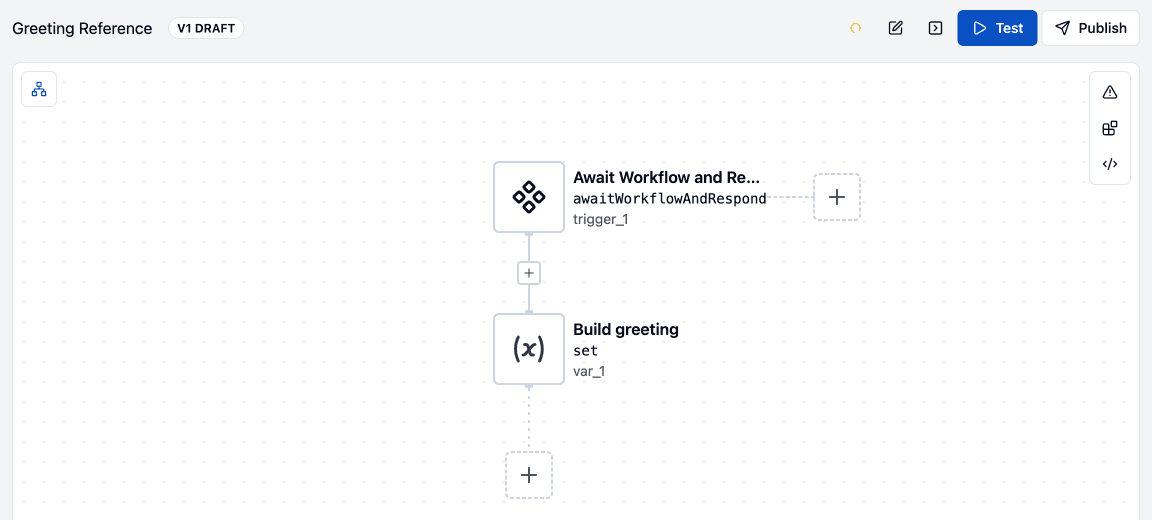
Copying Daily standup reminder works the same way. The copy arrives with the two issues we left in the template, so the user's first job is to pick their Slack connection and channel.
Note the V1 DRAFT badge. A copy is never live on arrival. That's a deliberate safety choice: a template might post to Slack or send email, and nothing should run on a customer's accounts until they've seen it and chosen which accounts to use.
Back on Automations, the copy is at the top of the list, created today and marked DRAFT:
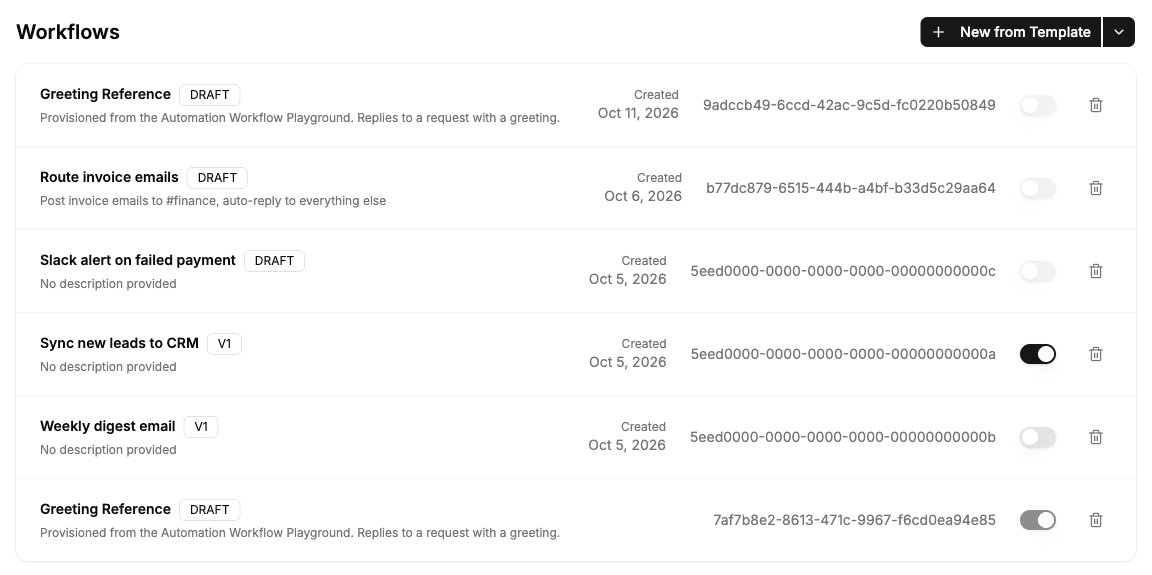
The screenshot also shows the difference this post keeps coming back to. The row at the top is a copy. The Greeting Reference row at the bottom came from the same template, but through the sample's Automation Playground, which provisions a reference instead of copying. Same template, two very different relationships to it. We'll compare them in a moment.
From Draft to Running
A copied workflow goes live the same way any other embedded workflow does. These are the calls from part seven, all authenticated with the user's JWT:
// 1. Bind the user's connection to each node that needs one
await fetchWithAuth(
    `/api/embedded/v1/automation/workflows/${workflowUuid}/workflow-nodes/slack_1/connection/slack`,
    {
        method: 'PUT',
        headers: {'Content-Type': 'application/json'},
        body: JSON.stringify({connectionId}),
    }
);

// 2. Freeze the current definition as the user's first version
await fetchWithAuth(`/api/embedded/v1/automation/workflows/${workflowUuid}/publish`, {
    method: 'POST',
    headers: {'Content-Type': 'application/json'},
    body: JSON.stringify({description: 'Created from template'}),
});

// 3. Turn it on (DELETE to turn it off)
await fetchWithAuth(`/api/embedded/v1/automation/workflows/${workflowUuid}/enable`, {method: 'POST'});
The sample app leaves these steps to the user. In the editor, a node without a connection shows a Create Connection button (because connectionDialogAllowed is true, it opens the ConnectDialog in place), Publish creates V1, and the toggle on the Automations list enables it.
You can also do all of it for the user. A gallery card can open a short "activate" wizard: pick a Slack account from GET /components/slack/connections, fill in any template inputs, then bind, publish and enable in one go. That's what ByteChef's own Automation Hub does: copy, wire connections, publish, set inputs, enable. When the wizard finishes, the user has a running automation without ever seeing a canvas.
Copy or Reference?
Copying is one of two ways to give a user a catalog workflow. The other is the reference, which the sample app demonstrates in its Automation Playground and which the Hub uses for code-native projects. They answer a single question differently: who owns the workflow after the user gets it?
| Copy | Reference | |
|---|---|---|
| Call | POST .../workflow-templates/{uuid}/copy | POST .../workflow-templates/{uuid}/provision |
| What the user gets | A new, independent workflow in their own project | No new workflow, just a per-user deployment of your catalog workflow |
| Can the user edit it? | Yes, it's theirs | No, it runs your definition |
| When you publish V2 of the template | Nothing changes; the copy is a snapshot | ByteChef rolls every reference forward to V2 |
| Connections | Bound per node after the copy | Auto-wired by component, or passed in the request |
| State after the call | Draft; publish and enable it yourself | Enabled when every required connection and input is resolved |
Use copy when the template is a starting point you expect users to customize. Use a reference when the workflow is really part of your product: you want to fix bugs once and have every customer get the fix, and you don't want anyone editing it.
The project's kind tells you which call to make. COPY projects support both. REFERENCE projects are code-native projects you deploy from ByteChef's Deploy Code Workflow dialog, and those can only be referenced: copying one returns 409 with {"reason": "CODE_WORKFLOW_NOT_COPYABLE"}. The sample gallery doesn't check kind because the sample catalog only holds COPY projects. A production gallery should either hide REFERENCE templates or send them to /provision instead.
Server-to-Server Variants
Everything above runs in the browser as the connected user. Each call also has a backend form under /{externalUserId}/..., authenticated with your environment's API secret key instead of the user's JWT:
| Browser (JWT) | Backend (API key) |
|---|---|
GET /automation/projects | GET /{externalUserId}/automation/projects |
POST /automation/workflow-templates/{uuid}/copy | POST /{externalUserId}/automation/workflow-templates/{uuid}/copy |
The backend form is the right tool when the decision isn't the user's. For example, copy a "Welcome" template into every new customer's account the moment they sign up, or offer a template only after a sales conversation. The permission expressions still apply, because ByteChef evaluates them against the connected user named in the path.
Hardening the Demo for Production
The sample gallery is intentionally small. Before you ship one, close these gaps:
- Respect
kind. HideREFERENCEtemplates, or route them to/provision. - Track what the user already has. Each template can be copied once per user. Compare the catalog with the user's workflows and show Added or Open instead of letting a second click fail.
- Show the trigger's app.
componentslists only tasks. Mention the trigger app in the label or description, or keep your own mapping. - Use
automationHubVisibledeliberately. The API returns hidden projects, so decide whether your gallery shows them. - Handle errors precisely. The sample shows one generic message. Distinguish "template no longer available" (a 404 once you remove it from the published version or change its permission expression) from transient failures.
- Offer activation, not just a copy. A two-step wizard (choose accounts, then Activate) turns a template into a running automation in under a minute, and that's the metric onboarding is judged on.
What You Own, What ByteChef Owns
Templates draw the line in a different place from the custom builder. There, you owned authoring. Here, ByteChef owns authoring and you own curation:
- You own which workflows exist, how they're grouped and described, who's allowed to see them (permission expressions on projects and workflows), when they change (publishing), and how the gallery looks and behaves in your product.
- ByteChef owns the editor you build templates in, versioning, per-user filtering, the copy-into-tenant machinery that keeps every customer's workflows isolated, component metadata and icons, per-user projects, connection storage, and the engine that runs every copy.
Your code for the whole feature is two API calls and a grid of cards. Behind it is the moment that decides whether a new customer sticks around: going from empty to I have an automation.
Eight Parts In
Here's the series so far:
- Connect your users' apps (the JWT and ConnectDialog everything rests on).
- Act on those connected apps directly with the ComponentKit.
- Chat with an AI assistant that uses the ComponentKit's tools.
- Trigger their workflows from your product's events.
- Call a workflow like a synchronous API.
- Agent over MCP: the same tools, discovered through an open protocol.
- Author workflows in a builder you designed yourself.
- Start from a template you curated (this part).
Parts seven and eight are the two ends of the same spectrum. A custom builder gives users full control and asks a lot of them. A template asks almost nothing and gets them to value fastest. Most products want both, plus ByteChef's own editor and AI options in between, and they all produce the same thing: a real ByteChef workflow in the user's own project.
Following along? In ByteChef, open Embedded → Automations, create a project with a workflow or two, and Publish it. Then run the embedded sample app, open Automations → New from Template, and click a card. Your customers' first automation is one click away.
Subscribe to the ByteChef Newsletter
Get the latest guides on complex automation, AI agents, and visual workflow best practices delivered to your inbox.