22 min read
Ivica Čardić
TL;DR: Field mapping lets each connected user decide where your fields land in their app. Declare a
field_mappinginput, passmapObjectFieldsto the Connect dialog so it loads options from the user's own account, and add a Field Mapping step that applies the saved mapping. It needs an@bytechef/embeddedrelease newer than 0.4.0.
In part thirteen, the Integration Marketplace opened the Connect dialog in your page instead of its iframe, and the reason was one prop: mapObjectFields. This part explains what that prop does, and the workflow side that makes it worth passing.
Say you sync contacts from your product into whatever CRM each customer connects. Your contact has firstName, jobTitle and a nested company.name. In one customer's Salesforce those belong in FirstName, Title and Company. Another keeps job titles in a custom field, and a third wants Leads instead of Contacts. You can't hardcode that, because only the customer, looking at their own account, knows where your jobTitle belongs.
Building that yourself means a settings screen, field-listing endpoints and storage per CRM, plus a hand-written transform. ByteChef Embedded reduces it to one workflow input, one config object on the Connect dialog and one workflow step.
Field mapping has a design-time half and a runtime half, and they meet on a single string. At design time, you declare a field_mapping input with "objectName": "Contacts" in the integration's workflow and add a Field Mapping step. At runtime, your connected user opens the Connect dialog, picks an object type and pairs each of your fields with one of theirs, using the mapObjectFields.Contacts config you passed.
The workflow holds neither the option lists nor the mapping. Object types and fields come from the user's live connection through callbacks you write, and the Field Mapping actions fetch the saved mapping by object name when they run.
We'll build one thing end to end. Your product emits a contact.created app event with a body like this:
{
    "contactId": "c_123",
    "firstName": "Ada",
    "lastName": "Lovelace",
    "email": "ada@example.com",
    "jobTitle": "CTO",
    "company": {"name": "Analytical Engines"}
}
You offer a Salesforce integration with a workflow called Sync new contacts to Salesforce, and each customer chooses whether contacts land as Leads or Contacts, and which Salesforce field each of your fields goes to.
Open the integration's workflow under Embedded → Integrations and look at the right sidebar. The Workflow Inputs panel is where you'd normally add an input, but its Create a new Input dialog only offers the scalar types (Boolean, Date, Date Time, Integer, Number, String and Time). A field-mapping input has to go into the workflow definition itself.
The quickest route is the Workflow Code Editor, the code icon in the same sidebar. Add the input to the inputs array and click Save:
{
    "inputs": [
        {
            "name": "contactMapping",
            "label": "Contact Mapping",
            "type": "field_mapping",
            "required": false,
            "objectName": "Contacts"
        }
    ]
}
To keep definitions in files, write the workflow as .json or .yaml and use Import Workflow, from the integration's menu on the Integrations list or the settings menu inside the integration.
type: field_mapping tells the Connect dialog to render the mapping UI instead of a text box. objectName joins the two halves: the dialog looks up mapObjectFields[objectName], and the Field Mapping actions find this input by it. The match is exact (Contacts isn't contacts), and the component only matches inputs that declare one, so always set it. name is how the saved value is stored and read (${contactMapping}), and label is the heading above the mapping in the dialog. required adds an asterisk to that heading; the dialog doesn't enforce it, but the engine does (see Gotchas).
The code editor's validation list checks inputs against the scalar types too, so it may report that type must be one of them. That doesn't block saving or publishing, and the input works as described.
Next, add the Field Mapping component (you'll find it under the Helpers category). It has one action per direction:
| Action | Name | Turns | Into | Use it |
|---|---|---|---|---|
| Map to Integration Object | mapToIntegration | Your object (firstName, jobTitle) | The integration's shape (FirstName, Title) | Before writing your data into the user's app |
| Map to Application Object | mapToApplication | An integration record (FirstName, Title) | Your shape (firstName, jobTitle) | Before handing a record from their app back to yours |
Both actions take the same properties:
| Property | Key | What it does |
|---|---|---|
| Object Name | objectName | The objectName declared on the field-mapping input, Contacts here. Required. |
| Input Type | inputType | OBJECT for one object, ARRAY for a list mapped item by item. Required. |
| Data | data | The object or array whose keys get renamed. Required. |
| Include Unmapped | includeUnmapped | Off by default, so keys no mapping covers are dropped. On, they're copied through unchanged. |
Notice what's missing: the mapping. You never wire the input into the action. At run time it finds the workflow's field_mapping input with the object name you gave it and loads the connected user's saved value on its own.
The rules it applies decide what reaches the user's account, so they're worth knowing. Dotted paths work on both sides: company.name is read out of a nested company object, and mapping back builds that object again. Absent keys are skipped, so a payload without jobTitle never blanks Title in the target system, but a key present with a null value copies the null. Unmapped keys are dropped by default, so contactId doesn't reach the output; with Include Unmapped on, they pass through under their original names, which a strict API like Salesforce rejects as unknown fields. If the user maps two of your fields to one Salesforce field, Map to Application Object writes the value to both of yours, while Map to Integration Object writes the one that comes later in the mapping. Arrays are mapped item by item, and every item must be an object.
Here's the complete workflow for the running example, ready to paste into the Workflow Code Editor:
{
    "label": "Sync new contacts to Salesforce",
    "description": "Creates a Salesforce record for every contact.created event, using the connected user's field mapping.",
    "inputs": [
        {
            "name": "contactMapping",
            "label": "Contact Mapping",
            "type": "field_mapping",
            "required": false,
            "objectName": "Contacts"
        }
    ],
    "triggers": [
        {
            "label": "Contact Created",
            "name": "trigger_1",
            "type": "appEvent/v1/newEvent",
            "parameters": {"appEventId": 1}
        }
    ],
    "tasks": [
        {
            "label": "Map to Salesforce fields",
            "name": "fieldMapping_1",
            "type": "fieldMapping/v1/mapToIntegration",
            "parameters": {
                "objectName": "Contacts",
                "inputType": "OBJECT",
                "data": "${trigger_1}",
                "includeUnmapped": false
            }
        },
        {
            "label": "Create Salesforce record",
            "name": "salesforce_1",
            "type": "salesforce/v1/createRecord",
            "parameters": {
                "object": "${contactMapping.objectType}",
                "fields": "${fieldMapping_1}"
            }
        }
    ]
}
Replace 1 with your own app event's id; the trigger's App Event Id dropdown fills it in when you build the trigger in the editor.
Contact Created receives your event body as trigger_1, and Map to Salesforce fields renames its keys with the user's mapping. For a user who mapped firstName, lastName, email, jobTitle and company.name to Lead fields, the output is:
{
    "FirstName": "Ada",
    "LastName": "Lovelace",
    "Email": "ada@example.com",
    "Title": "CTO",
    "Company": "Analytical Engines"
}
Create Salesforce record then posts that object. Its Salesforce Object comes from the mapping too: ${contactMapping.objectType} is the object type the user picked.
That shows the other way to use a saved mapping. A workflow input is a top-level value in the run's context, so ${contactMapping} is the whole saved object and ${contactMapping.objectType} one field of it. Use the data pill when a step needs to read the mapping, and the Field Mapping actions when it needs to apply it.
Both actions are callable from code too. A Script step reaches any component through context.component, so you can map and post-process in one place:
function perform(input, context) {
    const contacts = context.component.fieldMapping.mapToApplication({
        objectName: "Contacts",
        inputType: "ARRAY",
        data: input.records
    });

    return contacts.filter((contact) => contact.email);
}The editor's Test button runs without a connected user, so there's no saved mapping to read. Instead, the Field Mapping actions look for a sampleMapping under the object name in the input's test value:
{
    "objectType": "Lead",
    "Contacts": {
        "sampleMapping": {
            "mappings": [
                {"applicationField": {"custom": false, "label": "First name", "value": "firstName"}, "integrationField": "FirstName"},
                {"applicationField": {"custom": false, "label": "Last name", "value": "lastName"}, "integrationField": "LastName"},
                {"applicationField": {"custom": false, "label": "Email", "value": "email"}, "integrationField": "Email"},
                {"applicationField": {"custom": false, "label": "Job title", "value": "jobTitle"}, "integrationField": "Title"},
                {"applicationField": {"custom": false, "label": "Company", "value": "company.name"}, "integrationField": "Company"}
            ],
            "objectType": "Lead"
        }
    }
}
sampleMapping has exactly the shape the Connect dialog saves, so you can later paste a real one in. It's the only part the actions read, and the value may also be wrapped as {"mapObjectFields": {"Contacts": ...}}, which they unwrap. The top-level objectType is for data pills: in a test run ${contactMapping} is the whole test value, so that key makes ${contactMapping.objectType} resolve to Lead and lets the Create Salesforce record step run from the editor. Leave it out if no step reads the mapping directly. Test values you see elsewhere may also carry objectTypes, integrationFields and applicationFields lists; nothing reads them.
To set it, open Workflow Inputs, click the edit icon on contactMapping, paste the JSON into Test Value and click Save. The Type list has no Field Mapping entry; leave it alone and the input keeps its type. Don't use the Test Configuration dialog's Inputs tab, which only knows scalar types and renders no JSON field for this input.
Without a sample, a Field Mapping step fails in the editor with a message that names the fix: Add a sampleMapping to the 'Contact Mapping' input's test value to run this action from the editor. With one, the step produces real output, which gives later steps data pills to map from.
The switches from part four still apply. Before a user can see the mapping:
Now the runtime half, which needs an @bytechef/embedded release newer than 0.4.0. The API sends input types in upper case (FIELD_MAPPING), and the 0.4.0 Connect dialog only recognizes the lower-case spelling, so it shows a field mapping input as a plain text box instead of the mapping editor. Later releases accept either spelling.
Pass mapObjectFields to useConnectDialog, keyed by the same object name:
import {useConnectDialog, type MapObjectFieldsType, type OptionType} from '@bytechef/embedded';

interface SoqlResponseI {
    records?: Array<{Label: string; QualifiedApiName: string}>;
}

const SALESFORCE_OBJECT_TYPES: OptionType[] = [
    {label: 'Lead', value: 'Lead'},
    {label: 'Contact', value: 'Contact'},
];

const mapObjectFields: MapObjectFieldsType = {
    Contacts: {
        objectTypes: {
            get: async () => SALESFORCE_OBJECT_TYPES,
        },
        integrationFields: {
            get: async ({executeAction, objectType}) => {
                const response = (await executeAction('salesforce', 1, 'soqlQuery', {
                    q: `SELECT QualifiedApiName, Label FROM FieldDefinition WHERE EntityDefinition.QualifiedApiName = '${objectType}'`,
                })) as unknown as SoqlResponseI;

                return (response.records ?? [])
                    .map((record): OptionType => ({label: record.Label, value: record.QualifiedApiName}))
                    .sort((first, second) => first.label.localeCompare(second.label));
            },
        },
        applicationFields: {
            fields: [
                {label: 'First name', value: 'firstName'},
                {label: 'Last name', value: 'lastName'},
                {label: 'Email', value: 'email'},
                {label: 'Job title', value: 'jobTitle'},
                {label: 'Company', value: 'company.name'},
            ],
            userCanCreateFields: true,
            userCanRemoveMappings: true,
        },
    },
};

export function ConnectSalesforceButton({integrationId, jwtToken}: {integrationId: string; jwtToken: string}) {
    const {openDialog} = useConnectDialog({
        baseUrl: 'https://bytechef.example.com',
        environment: 'DEVELOPMENT',
        integrationId,
        jwtToken,
        mapObjectFields,
    });

    return <button onClick={openDialog}>Connect Salesforce</button>;
}
Each entry has three parts.
objectTypes.get fills the Object type select, and it doesn't have to call the remote system. Here it returns two fixed options, because Leads and Contacts are the only objects this sync makes sense for, and a fixed list guarantees the objectType the next callback receives is one you chose. For the user's full list, call executeAction here too.
integrationFields.get runs each time the user picks an object type and fills the select on every row. This one runs Salesforce's SOQL Query action on the user's own connection. Salesforce describes its schema in the FieldDefinition object, so the query lists every field of the chosen object, custom fields included, with the rows under records.
applicationFields describes your side of the table:
| Key | Type | What it does |
|---|---|---|
fields | OptionType[] | Your fields, one row each. value is what the Field Mapping actions read from and write to, so it can be a dotted path like company.name. Required. |
defaultFields | string[] | The values whose rows show when the dialog opens. Omit it to show every row; [] shows none. |
userCanRemoveMappings | boolean | Adds a Remove button to each row. |
userCanCreateFields | boolean | Adds Add custom field, for when your object has a flexible schema and users may map fields beyond the ones you listed. |
And the callback signatures:
| Callback | Receives | Returns |
|---|---|---|
objectTypes.get | {executeAction, search} | Promise<OptionType[]> |
integrationFields.get | {executeAction, objectType, search} | Promise<OptionType[]> |
OptionType is {label: string; value: string}. The dialog always passes search as undefined, so lists are flat with no search-as-you-type. MapObjectFieldsType, FieldMappingConfigType (one entry), FieldMappingValueType (the saved value) and OptionType are exported from @bytechef/embedded.
With the Integration Marketplace, pass the same object to its mapObjectFields prop; it hands it to the Connect dialog it opens in your page.
executeAction RunsYou never build executeAction. The SDK creates it for the dialog, bound to the current user and the integration instance being configured:
executeAction(componentName: string, componentVersion: number, actionName: string, input: Record<string, unknown>): Promise<unknown[]>Each call is one request to the endpoint the ComponentKit uses in part two:
POST /api/embedded/v1/{externalUserId}/components/salesforce/versions/1/actions/soqlQuery
Authorization: Bearer <connected user's JWT>
X-Environment: DEVELOPMENT
X-Instance-Id: 42
Content-Type: application/json

{"input": {"q": "SELECT QualifiedApiName, Label FROM FieldDefinition WHERE EntityDefinition.QualifiedApiName = 'Lead'"}}HTTP/1.1 200 OK
Content-Type: application/json
{"result": {"totalSize": 2, "done": true, "records": [{"QualifiedApiName": "FirstName", "Label": "First Name"}, ...]}}The SDK fills in everything you didn't write. {externalUserId} is the sub claim of your JWT, and ByteChef answers 401 if the path and the token's subject disagree. X-Environment is the hook's environment option, which defaults to PRODUCTION. X-Instance-Id is the integration instance the dialog is managing: ByteChef checks that the JWT's user owns it and answers 403 if not, so a callback can't reach another user's account. It also runs the action on that instance's connection, which is why componentName should be your integration's own component.
executeAction resolves to the response's result. It's typed as an array, but it's whatever the action returns; SOQL Query returns an object, hence the cast above. It also never throws. A network error or error status is logged to the browser console as Failed to execute action and resolves to [], so the dialog shows an empty list, and an unexpectedly empty select means it's time to check the console. Every call is also recorded under Embedded → External Invocations.
The mapping sits with every other workflow input, in the Connect dialog's managed view under the workflow's toggle. Here's that view from part one, for a workflow with no inputs:
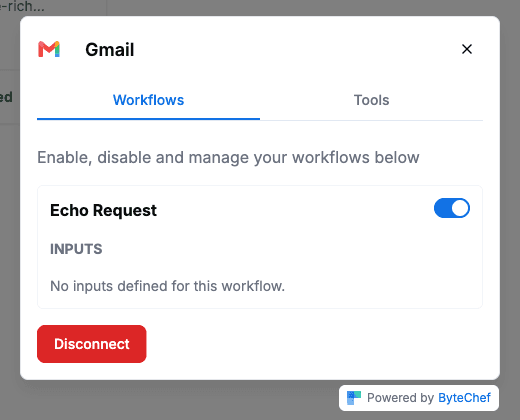
With the example workflow enabled, the INPUTS section holds the field mapping instead: a Contact Mapping heading, then an Object type select (placeholder Select object type) that objectTypes.get fills when the dialog mounts. Below it is one row per application field, labeled with your field's label. Each row's select reads Select object type first and stays disabled until an object type is chosen, then reads Select field and lists what integrationFields.get returned. userCanRemoveMappings adds a Remove button per row, and userCanCreateFields adds Add custom field, which asks for a name with the browser's own prompt and adds a row whose label and value are that name.
There's no Save button: every change saves on its own, 600 milliseconds after the user stops changing that workflow's inputs, and setting a row back to Select field clears it. The mapping only appears once the user has connected, because executeAction needs an integration instance to run against, and only on the Workflows tab. Field-mapping inputs on MCP workflows in the Tools tab don't show up.
The dialog saves the mapping as the input's value, through the call it already uses for workflow inputs:
PUT /api/embedded/v1/integration-instances/42/workflows/{workflowUuid}
Authorization: Bearer <connected user's JWT>
X-Environment: DEVELOPMENT
Content-Type: application/json

{
    "inputs": {
        "contactMapping": {
            "mappings": [
                {"applicationField": {"custom": false, "label": "First name", "value": "firstName"}, "integrationField": "FirstName"},
                {"applicationField": {"custom": false, "label": "Job title", "value": "jobTitle"}, "integrationField": "Title"},
                {"applicationField": {"custom": true, "label": "Lead source", "value": "Lead source"}, "integrationField": "LeadSource"}
            ],
            "objectType": "Lead"
        }
    }
}
ByteChef answers 204, or 404 if the instance isn't the user's. The body holds every input of the workflow, not just the mapping, because the server replaces the stored inputs with what it receives. Only completed rows are saved. custom: true marks a field the user made up, and its value is exactly what they typed, spaces included, so a payload needs a key with that name for it to map.
Your app can read the value back: GET /api/embedded/v1/integrations/{id} returns the user's integrationInstances, each with its workflows and their inputs, typed by FieldMappingValueType. That's how you'd show "Leads, 5 fields mapped" in your own UI.
Your backend can write it too, through PUT /api/embedded/v1/{externalUserId}/integration-instances/{id}/workflows/{workflowUuid} with your environment's API secret key instead of a JWT. Use it to pre-fill a sensible default right after a user connects, so the workflow works before they open the mapping. Send all of the workflow's inputs: whatever you leave out is removed.
When the workflow runs for a connected user, its inputs are the values your admins set on the integration configuration plus the values the user saved, with the trigger's output next to them. That's why ${contactMapping} and ${trigger_1} are both available to every step. A Field Mapping step then:
objectName equals the step's Object Name. None, or more than one, is an error listing what the workflow declares.sampleMapping in the editor, or the value saved on the user's integration instance in a live run.Plan for two failures, both readable in the run's execution details under Embedded → Workflow Executions: The connected user has not completed the 'Contact Mapping' field mapping (the user enabled the workflow but never touched the mapping) and Field mapping has no mappings (they picked an object type but paired no fields).
The embedded sample app passes a Contacts entry in two places: front-end/src/app/integrations/page.tsx, the hand-built page from part one, passes it to useConnectDialog, and front-end/src/app/integration-marketplace/page.tsx passes the same object to IntegrationMarketplace, as in part thirteen. Both configure two application fields, Title (title) and Email (email), with defaultFields: [], userCanCreateFields: true and userCanRemoveMappings: true, so no rows show at first and the user builds the mapping from Add custom field.
Treat their callbacks as a template, not working code. They call listObjects and listObjectFields on the salesforce component, with a comment saying to replace them with names your integration exposes. The Salesforce component has no actions by those names, so the calls fail and the selects stay empty. Swap in the SOQL Query callback from Step 5, or whatever action lists fields for your integration.
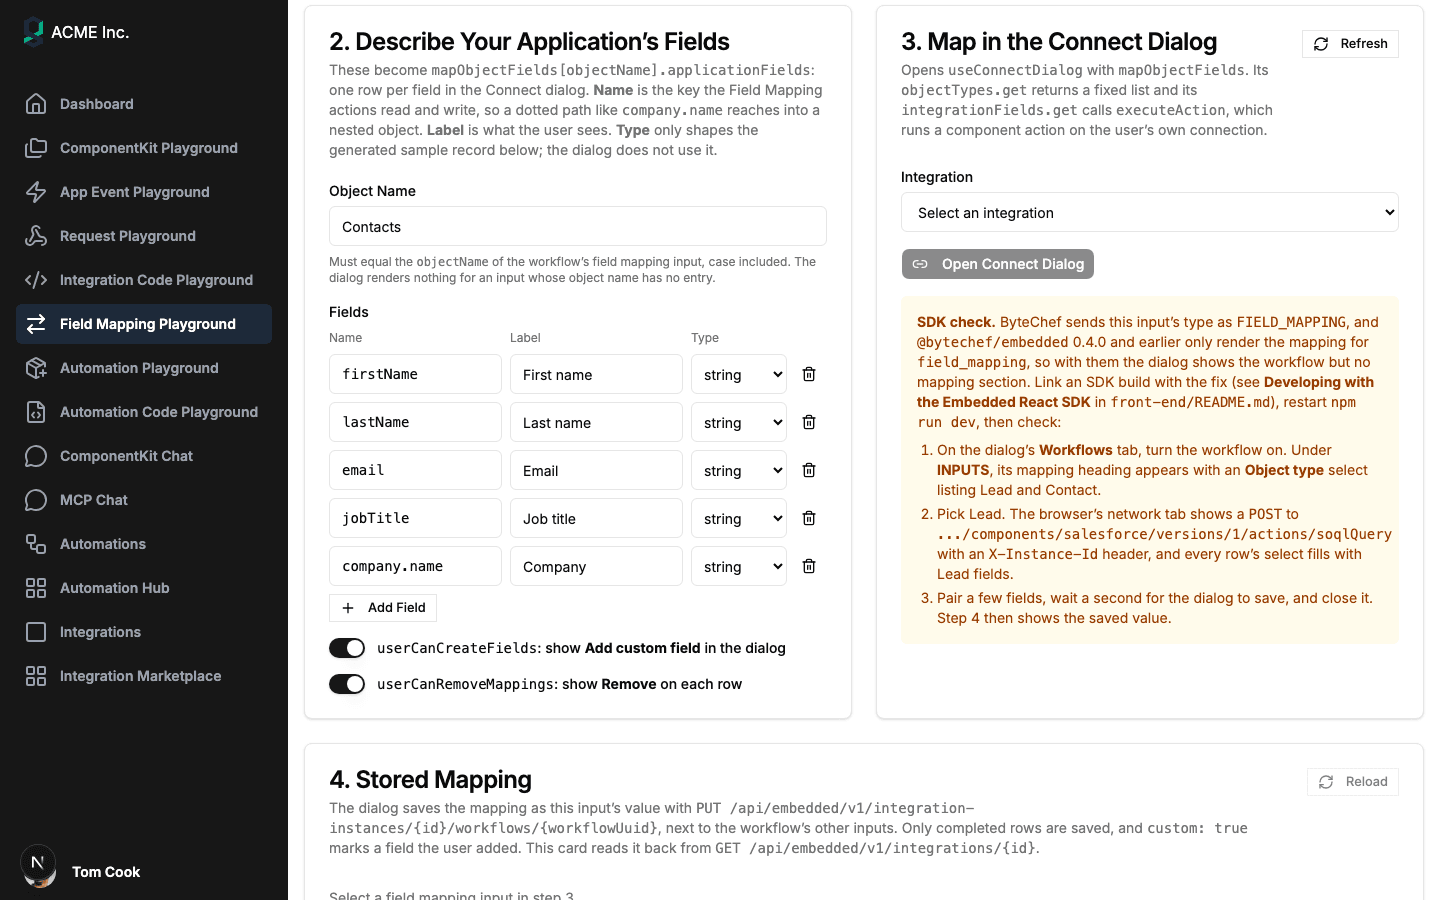
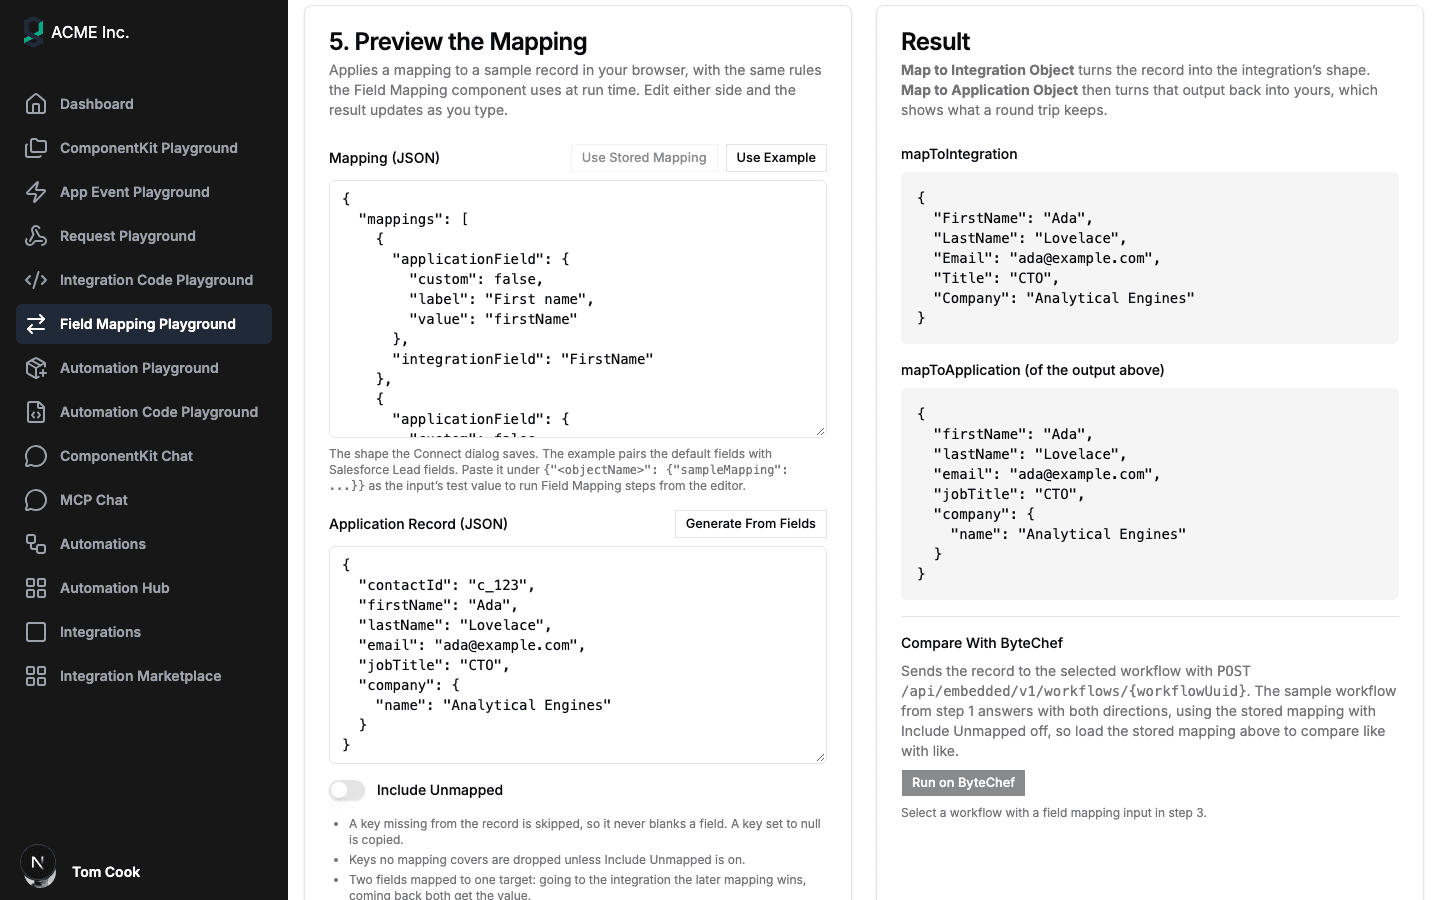
To explore before wiring your own page, open the sample app's Field Mapping Playground at /field-mapping. It walks through preparing the workflow in ByteChef, describing your application's fields, mapping in the Connect dialog, reading the stored mapping back and previewing a sample record in both directions:
@bytechef/embedded 0.4.0. Upgrade before debugging your callbacks; with 0.4.0 they never run.mapObjectFields has no entry for the input's objectName, the dialog renders nothing for that input: no error, no placeholder.field_mapping inputs that both declare Contacts make the Field Mapping actions fail rather than guess.applicationFields each time it opens. A custom field added earlier stays in the saved value but gets no row back, and the next change saves without it. The same goes for a pairing whose field you later hide with defaultFields or drop from fields. If custom fields matter to your users, list the common ones in fields.required isn't enforced in the dialog. The user can close it with nothing mapped. If the input is required, the run stops before its first step because the input has no value; if not, the Field Mapping step fails with the has not completed message. The second is easier to find in the executions list, which is why the example uses required: false.LastName and Company; if they aren't mapped, the Create Record step fails, not the mapping.get callbacks, or in the action behind executeAction, become an empty list. Object types load once when the mapping appears; if that call fails, the user has to close and reopen the dialog.objectType into a SOQL string, which is safe only because objectTypes.get returns a fixed list. If object types come from the remote system, validate the value first.@bytechef/embedded release newer than 0.4.0 in every frontend that shows the Connect dialog, including the IntegrationMarketplace.environment explicitly to useConnectDialog. It defaults to PRODUCTION, and executeAction uses it too.sampleMapping for every field-mapping input, so each Field Mapping step is testable in the editor and gives later steps real data pills.PUT, and point users at the mapping right after they connect.applicationFields deliberately: the fields most users need, with dotted paths for nested data.You own the field-mapping input and its object name, the workflow and test value, which of your fields are mappable, the callbacks that decide which remote objects and fields are offered, and any defaults your backend writes. ByteChef owns the mapping UI, running your callbacks' actions on the user's credentials with ownership checks, storing every user's mapping, the Field Mapping component's nested, null-safe renaming in both directions, and the run-time lookup by object name. Your side is one input, one step and one config object with two callbacks; every customer gets a mapping screen for their own account.
Every executeAction call here ran on a connection the user owns. Sometimes the account is yours instead: the Slack workspace your alerts go to, or the API key you pay for. The next part, Shared Connections, covers sharing one account with every connected user in an environment, what they can and can't do with it, and the endpoints they use to manage the connections that are theirs.
Here's the whole series so far:
Field mapping is where earlier parts meet: a workflow input in the part one Connect dialog, filled through the ComponentKit's action endpoint, usually fed by an app event, and identical whether the dialog opens from your page or the Integration Marketplace. What it adds is a per-customer answer to where does my data go.
Following along? Add a field_mapping input with "objectName": "Contacts" to one of your integration's workflows, give it a sampleMapping, and put a Map to Integration Object step in front of the step that writes. Then run the embedded sample app, replace the Contacts callbacks on its Integrations page with ones your integration supports, connect, and map your first fields.
Get the latest guides on complex automation, AI agents, and visual workflow best practices delivered to your inbox.